Monero is a secure, untraceable and resilient digital currency. Read Monero vs Bitcoin: Privacy and Design Trade-offs.

How to Run a Monero Node

Last updated on

Introduction

Nodes are an important part of the Monero network infrastructure. Nodes simply store a copy of the blockchain. They can optionally be configured to share this information with other nodes and clients. Running a node is the only way to get the highest level of privacy and security when connecting to the Monero network. In Monero, the program for running a full node is called the “daemon”.

Running a Monero node uses meaningful disk space, bandwidth, and disk I/O. Currently, it is better to think in terms of unpruned versus pruned nodes, rather than a single “blockchain size” number.

Recommended default: run a pruned node unless you explicitly need full archival history. Pruning saves a large amount of disk space while keeping the same consensus validation security (a pruned node still verifies blocks and rules locally).

Initial sync time varies widely with SSD speed and available I/O. A fast SSD and stable connection matter more than CPU for most setups. Bandwidth usage also varies depending on how many peers you serve and whether you accept inbound connections. For tips to improve the initial time, read our How to speed up Initial Monero Blockchain Sync guide.

Many people run the daemon from a terminal interface, especially if they are running a VPS. You may also want to do this if you want to stay in-sync without keeping the wallet open.

This guide will cover using Windows, Mac, and Linux and assumes you have a 64-bit operating system.

If You Already Have the Monero GUI Running (All Operating Systems)

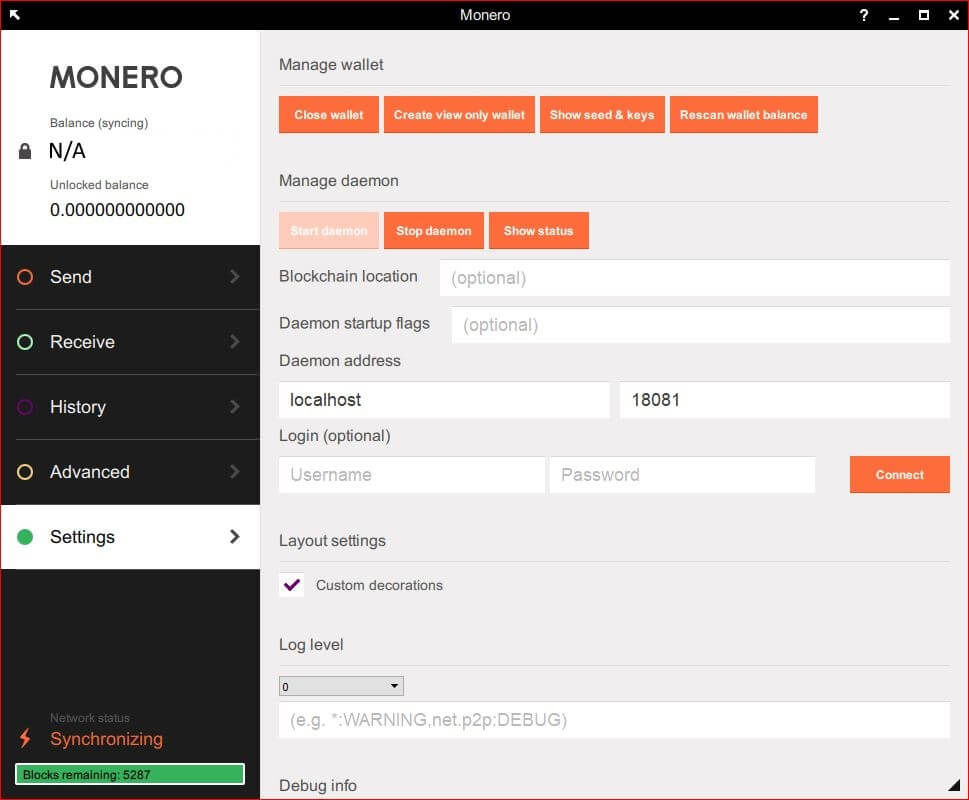
If you are running the official Monero GUI, it will prompt you to run the daemon locally by default. This is the same as running a full node. Specify “localhost” as the daemon address in settings and click “start daemon”. You can manually specify daemon options in the “daemon startup flags” if desired e.g., --prune-blockchain. The GUI should start and stop the daemon process automatically.

Monero GUI Wallet
The Monero GUI wallet includes a full Monero node daemon.

Note: the Monero GUI changes over time, so button names and settings layout may differ slightly by version. For advanced configuration, the underlying daemon is still monerod, and the authoritative reference for flags is the monerod flag reference.

Run a Monero Node on Windows

Download the latest Monero software from the official Monero downloads page. For security, verify the binary before running it. The Monero Project provides a Windows verification guide.

Extract the contents of the .zip file that is downloaded. To do this, you can simply double-click on the .zip file, click on the extract tab in the ribbon, and then the “extract all” option. Choose a folder to extract these to, making sure to remember it.

You can run the daemon with all the default options by simply running “monerod.exe”. If you would like to include options, it’s best to create a batch file.

To create a batch file, open notepad by searching for it in the start menu. Type in the following:

monerod.exe
Append additional options after monerod.exe. Eg: monerod.exe --prune-blockchain --sync-pruned-blocks.
monerod.exe --prune-blockchain

Save the file in the same folder that monerod.exe is located in. When saving, change the “save as type” to “all files (*.*)”. Name the file “Run monerod.bat”. The name can vary, but make sure that it ends in .bat.

You can run the daemon by double-clicking on the created .bat file. This will; run monerod.exe with the chosen options.

Run a Monero Node on Mac

Download the latest Monero software from the official Monero downloads page.

Extract the contents of the downloaded file, and open a terminal by searching for it in applications. Navigate to the extracted file location. If you saved it to Documents, for example, use:

cd ~/Documents
Run the following command, appending additional options at the end if desired:
./monerod --prune-blockchain

Run a Monero Node on Linux (Debian / Ubuntu)

Download Monero from the official Monero downloads page. Before running any downloaded binary, follow the Monero Project’s verification guidance: Verify Monero binaries.

1) Extract and run (foreground, simplest)

cd ~ tar -xvf monero-linux-x64-*.tar.bz2 cd monero-*/
./monerod --prune-blockchain --data-dir ~/.bitmonero

The --prune-blockchain option reduces disk usage while keeping full validation security. (Pruning removes redundant historical data; it does not reduce privacy or consensus correctness.)

2) Run in the background (screen-compatible, but see 3 below)

If you prefer the original “keep it running after disconnecting” approach, screen still works. Many modern servers use systemd services, but screen remains a practical option for quick setups.

sudo apt-get update sudo apt-get install -y screen
screen -S monero cd ~/monero-*/ ./monerod --prune-blockchain --data-dir ~/.bitmonero

Detach from screen with: Ctrl + a then d. Reattach with:

screen -r monero

3) Run monerod as a systemd service (recommended for servers)

On modern Linux systems, running monerod as a systemd service is the preferred approach for long-running nodes. It ensures the daemon starts on boot, restarts on failure, and integrates cleanly with system logs.

This approach is recommended for VPS and dedicated servers. For quick or temporary setups, screen remains acceptable.

1) Create a systemd service file

sudo nano /etc/systemd/system/monerod.service

2) Paste the following configuration

[Unit] Description=Monero Daemon After=network-online.target [Service] User=YOUR_LINUX_USERNAME ExecStart=/home/YOUR_LINUX_USERNAME/monero-*/monerod \ --prune-blockchain \ --data-dir /home/YOUR_LINUX_USERNAME/.bitmonero Restart=always RestartSec=10 LimitNOFILE=8192 [Install] WantedBy=multi-user.target

Replace YOUR_LINUX_USERNAME with the user running the node and adjust the ExecStart path if needed.

3) Enable and start the service

sudo systemctl daemon-reload sudo systemctl enable monerod sudo systemctl start monerod

4) Check status and logs

systemctl status monerod journalctl -u monerod -f

Opening Up the Monero Daemon

This section applies to all operating systems. It explains how the monerod daemon exposes network services (P2P and RPC) regardless of whether you are running Linux, Windows, or macOS. Firewall commands shown later are OS-specific examples.

There are two different “network surfaces” to think about:

  • P2P port (default 18080): this is how your node talks to other nodes and helps the network. If you want to contribute connectivity, opening inbound TCP 18080 can help.
  • RPC ports (wallet/control API): these are for wallets or tools talking to your node. Do not expose unrestricted RPC to the public internet.

The Monero Project documents daemon flags (including RPC restriction options) in the monerod reference. In general, keep RPC bound to localhost unless you have a specific need.

Safe default (recommended)

  • Open inbound TCP 18080 (P2P) if you want to accept inbound peers.
  • Keep RPC private (localhost / LAN only).

If you need a public RPC for wallet access

Use a restricted RPC interface and keep your unrestricted control RPC private. One common approach is:

./monerod --rpc-bind-ip 127.0.0.1 --rpc-bind-port 18081 \ --rpc-restricted-bind-port 18089 --rpc-restricted-bind-ip 0.0.0.0 \ --confirm-external-bind

The restricted RPC port is intended for wallet-style queries and reduces risk compared with exposing the default unrestricted RPC. Common misunderstanding: “any RPC is safe if I set a password” — a password helps, but the safer baseline is not exposing unrestricted RPC at all.

If you are using ufw on a VPS and you choose to open inbound ports, a minimal example is:

sudo ufw allow 18080/tcp sudo ufw allow 18089/tcp

Additional Monero Daemon Options

Below are some popular daemon options. Please ignore all brackets [] and the help text after #. You will need to replace these with your own values.

Important: treat RPC settings as security-sensitive. The safest default is to bind RPC to 127.0.0.1 (localhost). Only bind RPC to external interfaces if you understand the trade-offs and are using restricted RPC and firewall rules.

--rpc-bind-ip [IP] # Binds the daemon to an IP address. You need to use your external IP if you plan to access this daemon from outside the internal network, or an internal one if you only want it to work for devices in the same network. If you are unsure about whether to use internal or external, you most likely want to use the external IP address. You can find this by using the IP address the VPS provider gave you or by searching for it with a site such as ipleak.net. --rpc-bind-port [PORT] # Binds the daemon to a port. Keep in mind the daemon will be unsafe unless this option is also run with --restricted-rpc. The default option is 18081, though some services (such as MoneroWorld) use 18089. --restricted-rpc # Restricts the actions that external users can perform when they are connected to the node over RPC. You will typically want to use this option. --confirm-external-bind # A required verification if using RPC bind options. --rpc-login [USERNAME]:[PASSWORD] # Restricts use of the node to users who know the username and password. Make sure to use a strong password. --limit [KB/s] # Limits the total download and upload limit to a certain value in kilobytes per second. Eg: 128 would set the maximum upload and download speed to one megabit per second. --limit_up [KB/s] # Limits the total upload speed to a certain value in kilobytes per second. --limit_down [KB/s] # Limits the total download speed to a certain value in kilobytes per second. --data-dir [LOCATION] # Saves the blockchain to a manual location by file path. Can be used to save the blockchain in another folder on one hard drive or even another hard drive or flash drive. --db-sync-mode safe # Syncs the blockchain in a way that avoids corruption. This is much slower, so it’s typically best to run with the normal parameters without worrying about a very small chance of corruption. --out-peers [NUM] # Sets the max number of outgoing peers (ones you connect with). The default is 8. --block-sync-size [NUM] # Sets the number of batched blocks. The default is 20. If you are having issues syncing the blockchain, try reducing the number to 10. --db-salvage # Try using this command if your database becomes corrupt. --add-peer [IP]:[PORT] # Manually adds a peer by IP address and port.

Conclusion

Running your own Monero node is one of the most effective ways to improve privacy, strengthen decentralization, and reduce reliance on third-party infrastructure. Whether you choose a simple foreground setup, a background session, or a system-managed service, the most important principles remain the same: verify what you run, keep RPC interfaces appropriately restricted, and choose defaults that prioritize safety and long-term reliability. A well-maintained local node benefits both you and the Monero network as a whole.

Latest Price
Exchange instantly
Latest articles
Sponsor
Best XMR Trading Services
Kraken   Best overall trading exchange
Bitfinex   Long-standing and reputable trading exchange
XMR Hardware Wallets
Sponsor
Monero.how Tutorials
Monero ELI5 (Explain like I'm five) - a super simple explanation of how Monero works
How Monero's privacy works
How Monero Works: Low-Level Details in Plain English
Monero Infographic
How long do Monero transactions take to confirm and unlock?
Transaction fees
Glossary of the most important Monero terms
Best Monero Wallets (2026): Trusted Picks and Clear Trade-offs
How to use the Monero GUI wallet
How to create a Monero command line wallet
How to speed up initial blockchain sync
How to send and receive Monero on the command line
How to Prove a Monero Payment (Command Line Wallet)
How to restore a command line wallet from your 25 word seed
How to verify your funds with a private view key
Best Ways to Buy, Sell, and Exchange Monero (XMR) in 2026
Set up a Monero wallet on a USB pendrive linux computer using a remote daemon
How to Mine Monero in 2026 – CPU Mining & the GPU Reality
How to Mine Monero on Windows (2026): XMRig (CLI) + P2Pool + GUI Options
Monero mining calculator
P2Pool for Monero: How It Works, Mini, and Payouts
How to run a Monero Node
Configure OpenAlias to more easily share your Monero address
How to Safely Hold Monero in Cold Storage
Create a paper wallet for secure offline storage
Display a Monero ticker on your Mac menu bar
How to Avoid Scams and Evaluate Trust in Monero
Avoiding Ad-Based Attacks Against Monero Users
Send feedback, corrections or suggestions to hellomonero.how
Donations for running costs appreciated at 86oPE889B4qeJn14jkhQkPFnwRUV3Upd8TZjbU89JdWpH7NbECNHXMG67vSLCKZt1nTWK4v445cndXLNtw24WzmNGYs7WeH
Thanks to Monero developers and community members that answered questions that contributed to the content in this site: jollymort, hyc, moneromoo, smooth, jwinterm, debruyne, fluffypony, pero, needmoney90, ferretinjapan, idunk, saddam, wolf0, daveyjones, snipa, gingeropolous, markos, othe, m5m400, luigi1111, kenshi84
Disclaimer: This site contains opinion for informational purposes only and does not consitute investment advice. Information may contain errors and omissions. Use solely at your own risk. Services listed here are run by third parties and are not vetted by this site. The authors of this site and/or the authors of articles linked to from this site may have financial investments that may bias their opinions, including ownership of Monero currency. Always do your own research, form your own opinions, and never take risks with money or trust third parties without verifying their credibility. Remember to take your computer security seriously and never use a computer or phone that is at risk of infection by untrusted software that may contain malware or viruses. © Copyright 2025.