This guide will show you how to register and verify your email at
Binance,
how to setup 2FA for your account, how to deposit Bitcoin into your account, how to trade your Bitcoin for
Monero, and then how to withdraw your Monero off the exchange into your own wallet.
You can use this guide in conjuction with
Part 1 of the How to Buy Monero via Coinbase guide,
and then use this guide as a substitute for
Part 2.
This guide assumes you already own cryptocurrency such as Bitcoin or Ethereum. If you don’t, go buy some
BTC or LTC at your local cryptocurrency exchange or from your cryptocurrency seller. You will need it to
trade it for Monero. You can also always buy Monero directly using LocalMonero as explained in our
How to Buy Monero Using LocalMonero guide.
Binance only offers
XMR/BTC and
ETH/XMR
trading pairs, so if you want to deposit a cryptocurrency such as
LTC to Binance, bear in mind that you will have to trade your LTC for BTC first, and then trade BTC to XMR.
Finally, I also must stress, Binance currently has a minimum of 0.1 XMR withdrawal, and their withdrawal
fee is somewhat expensive at 0.04 XMR. If you are looking at using an exchange to trade small amounts of
cryptocurrency for Monero, you may be better suited to use an exchange such as Poloniex with a withdrawal
fee of only 0.015 XMR.
LocalMonero may
also be a cheaper option. A extensive list of exchanges and other options to buy Monero can found in our
general
How to Buy Monero guide.
Step 1.
In your address bar, type in
www.binance.com. You need to make sure
you type it in yourself. Do not just
type it into a Google search and click the link. If you click a link to the Binance website you are at risk
of ending up on a fake phishing page and can lose your coins.
So don’t be lazy, type in your address bar
www.binance.com, and
once it loads check that the text in the address bar doesn’t have any spelling errors or weird text
characters. I can’t stress how much a simple measure like this can help prevent you from being phished!
You can also trust and visit
Binance from
the links in this website.
Ok now we are sure we are in the correct website we need to register to use Binance.
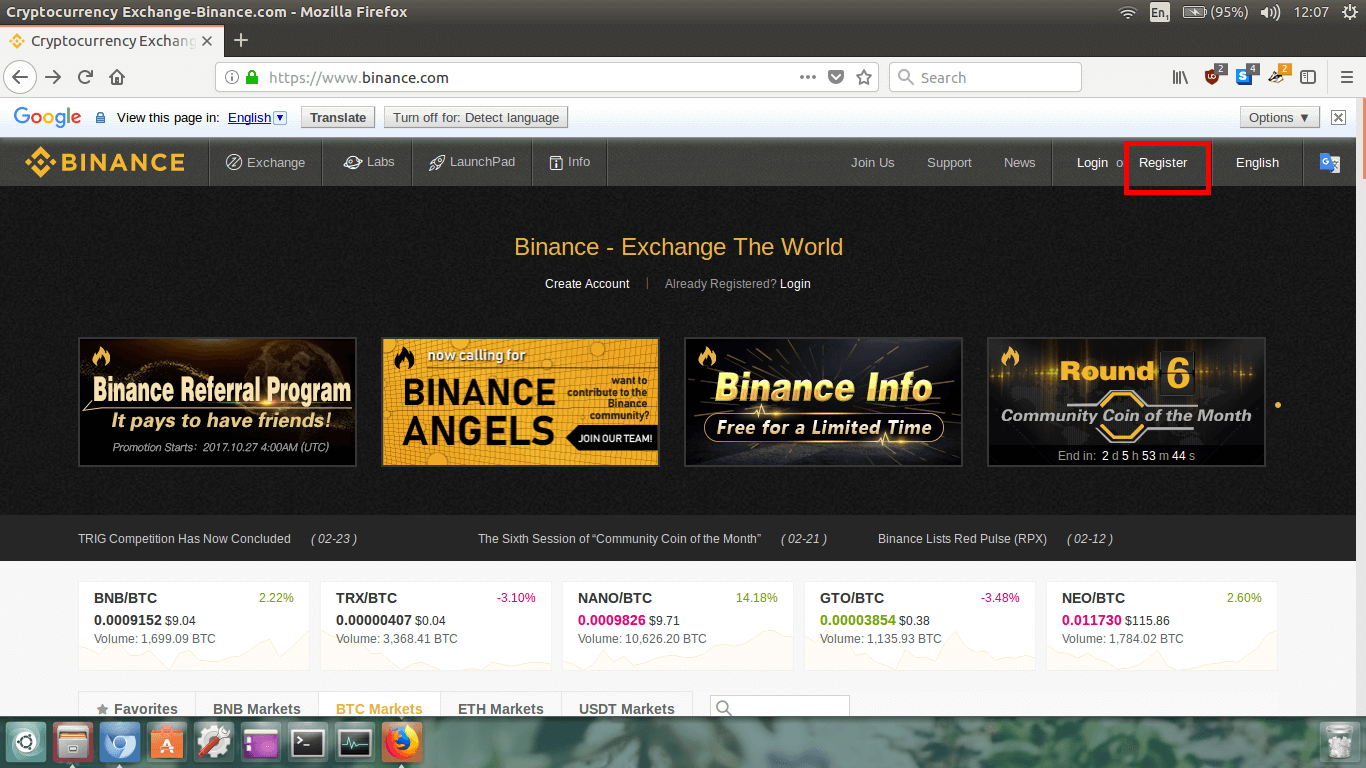
In the upper right corner of the homepage click on
Register.
Step 2.
Let’s now enter our details in.
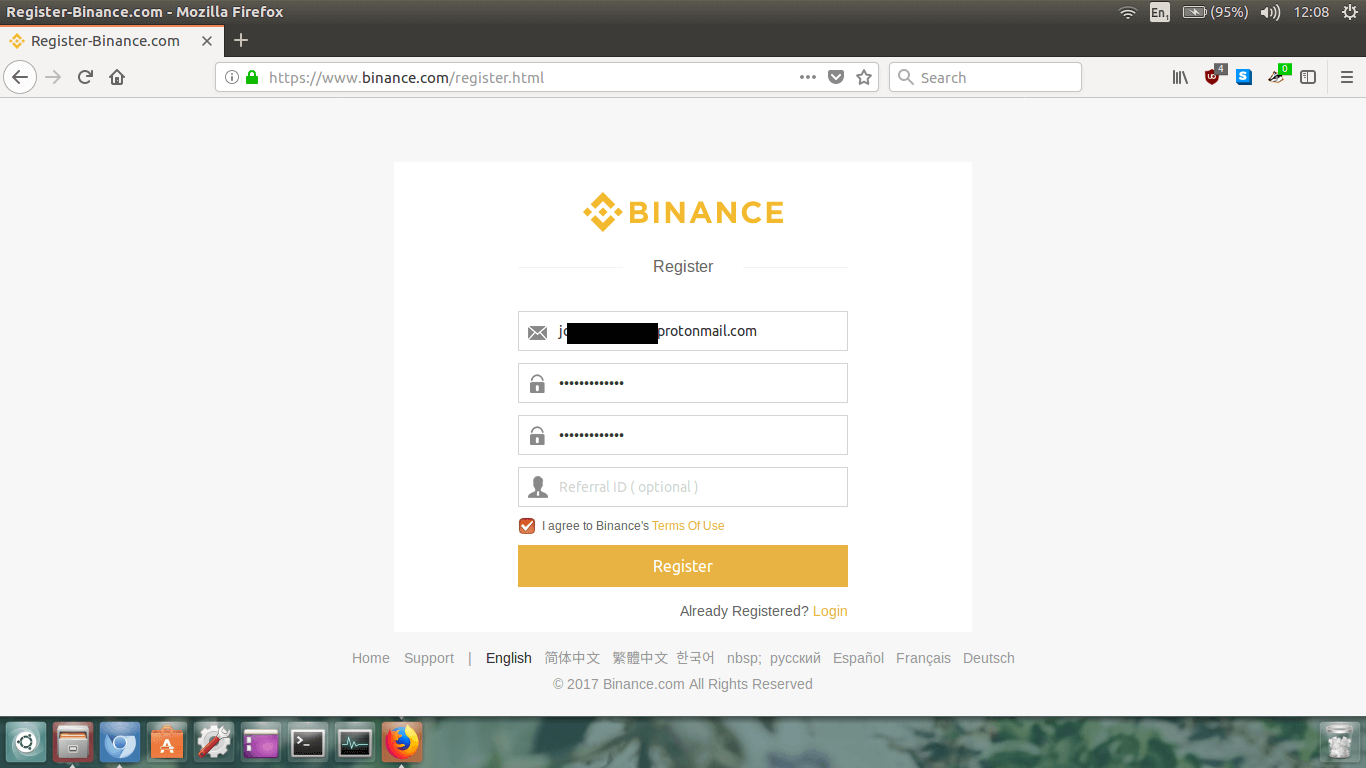
Enter your email address and password twice, check the
Terms Of Use
box, and then click the
Register button.
A little captcha type puzzle will now load.

Click and drag the slider left to right until the puzzle piece fits perfectly.
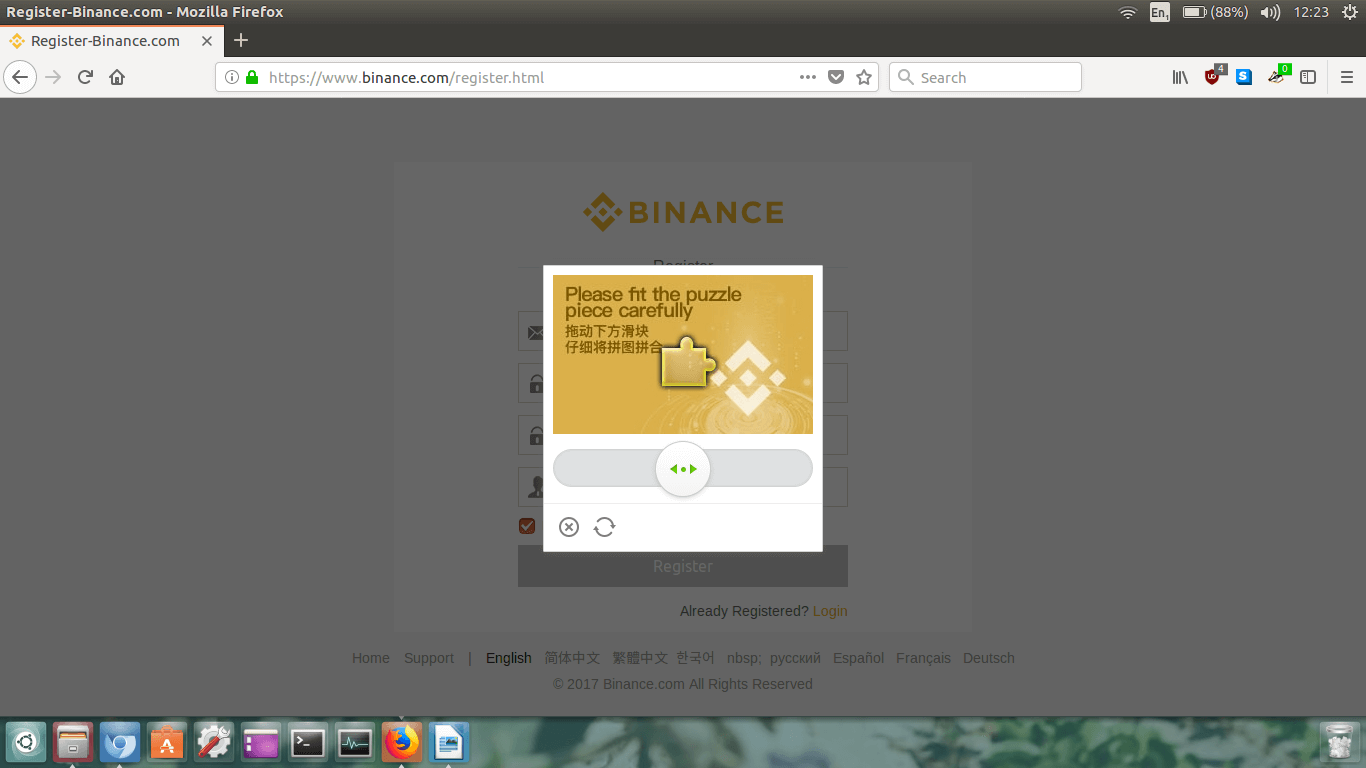
That was fun wasn’t it?! They even tell you how fast you are!
Now the email verification page will load up.
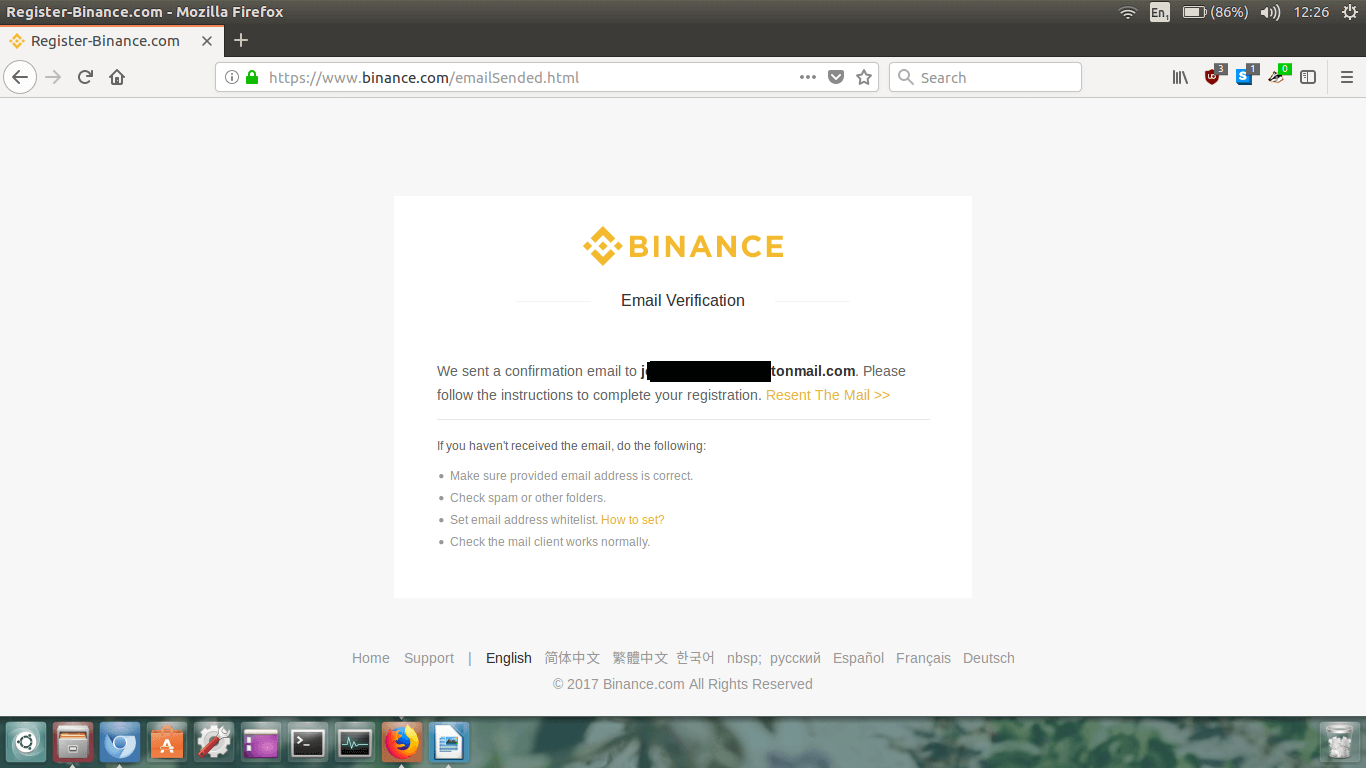
Step 3.
You now have to go into your email inbox to check the confirmation email. Login to your personal email
(e.g gmail, hotmail, etc.)
Find the email from Binance and open it. Sometimes they take a while to send through!
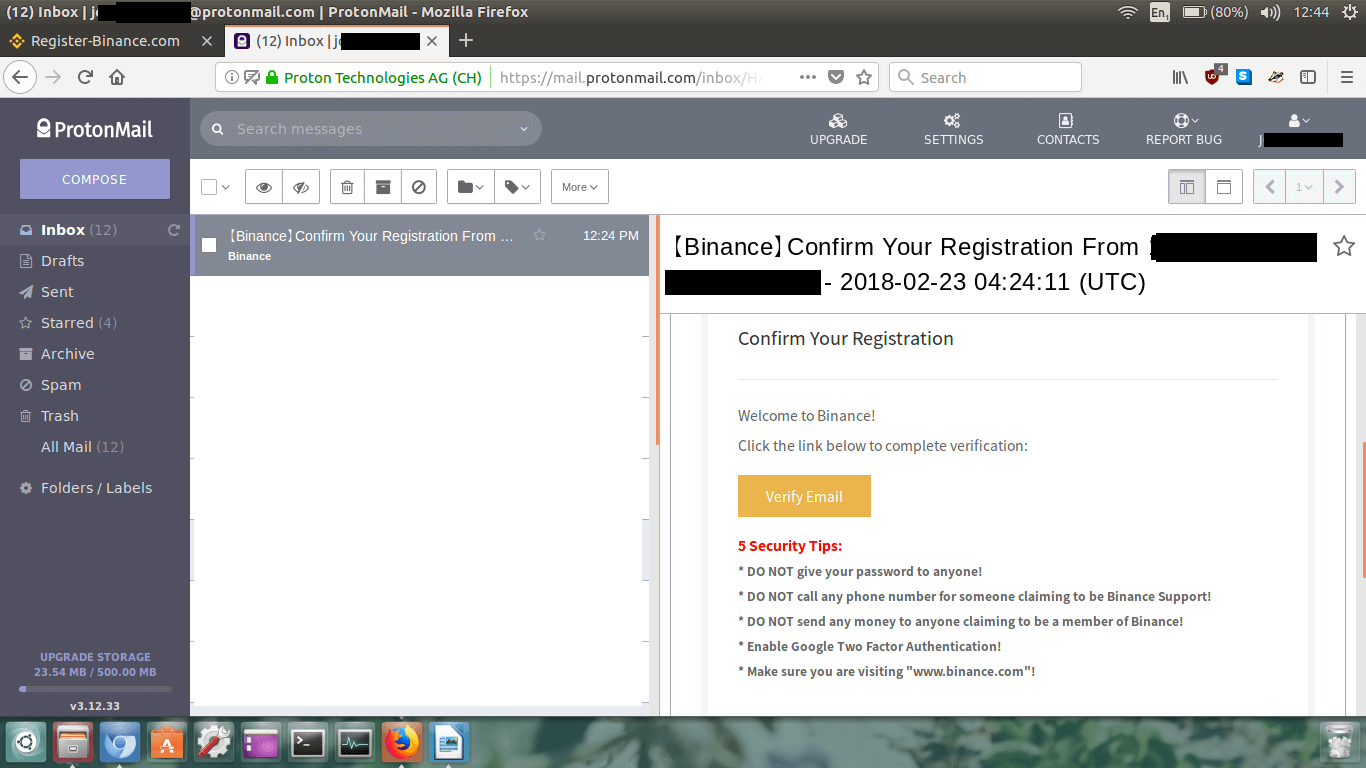
Read the email, and then click the big button that says
Verify Email.
A new page will load up in your browser.
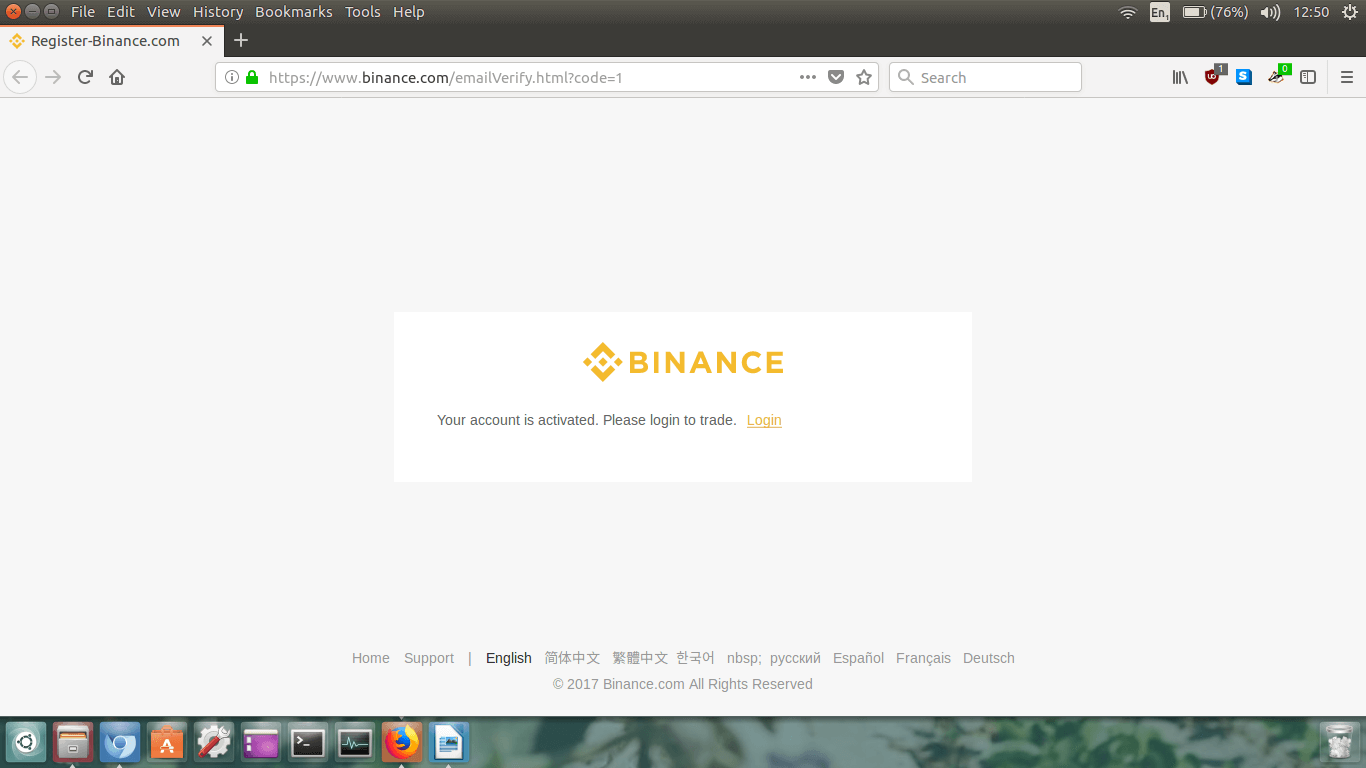
It should say that your account is activated.
Now we login to our account. Click the little orange
Login link.
Step 4.
A new login page will open in your browser.
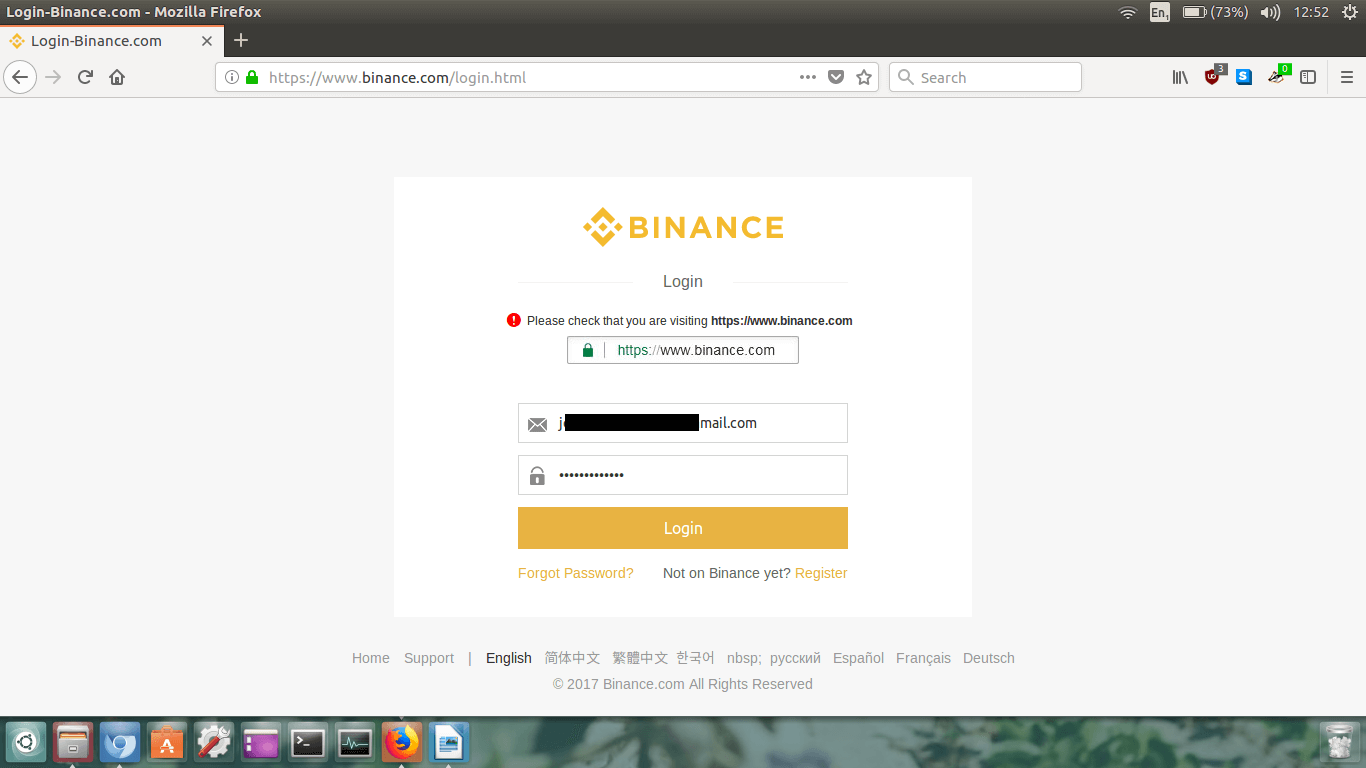
Type your email address and password, then click
Login.
Again you will be prompted to complete a puzzle piece security captcha. Complete the puzzle and then the
Safety Risk page will load.
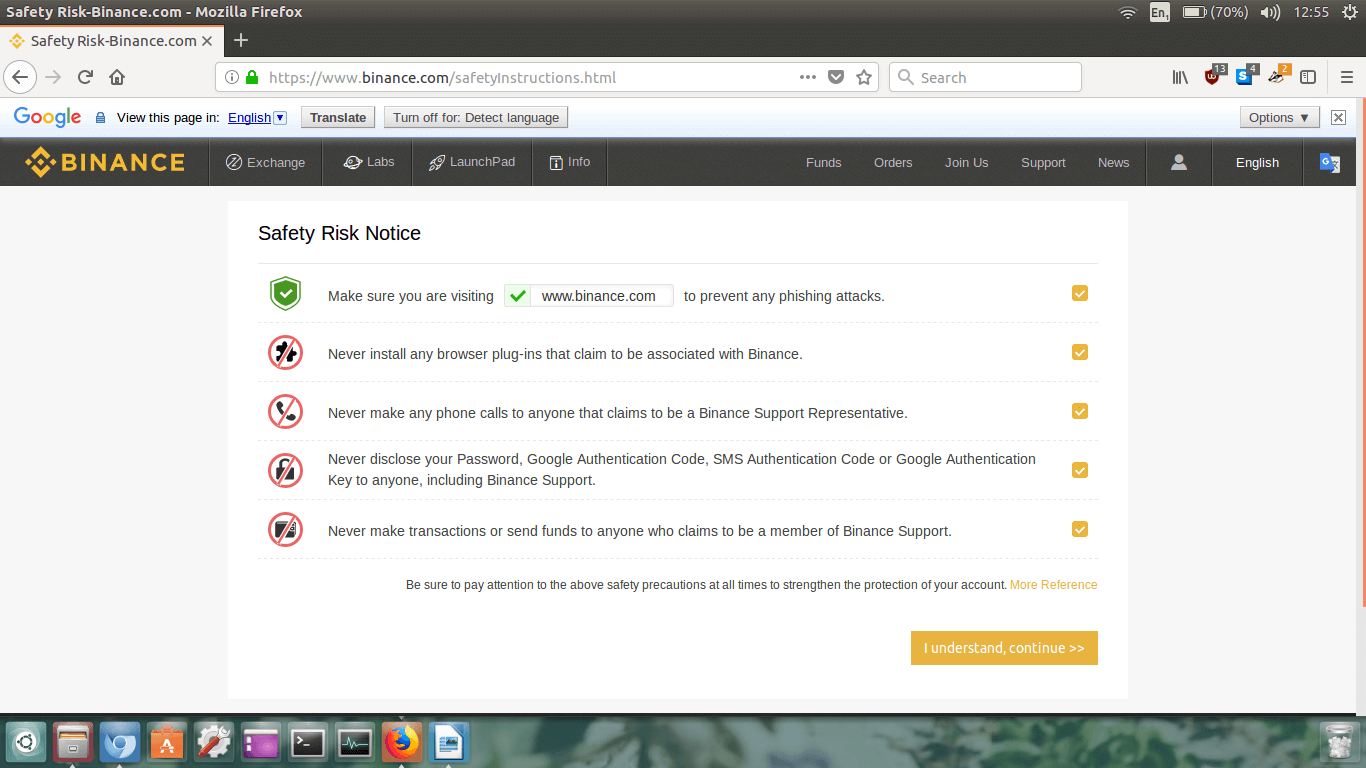
Make sure you read and understand all the safety risks. Tick each one, once you have read and understood
them. Once all the boxes are ticked, click
I understand, continue >>.
Your account page will load and there will be a security reminder regarding 2FA (2 Factor Authentication).
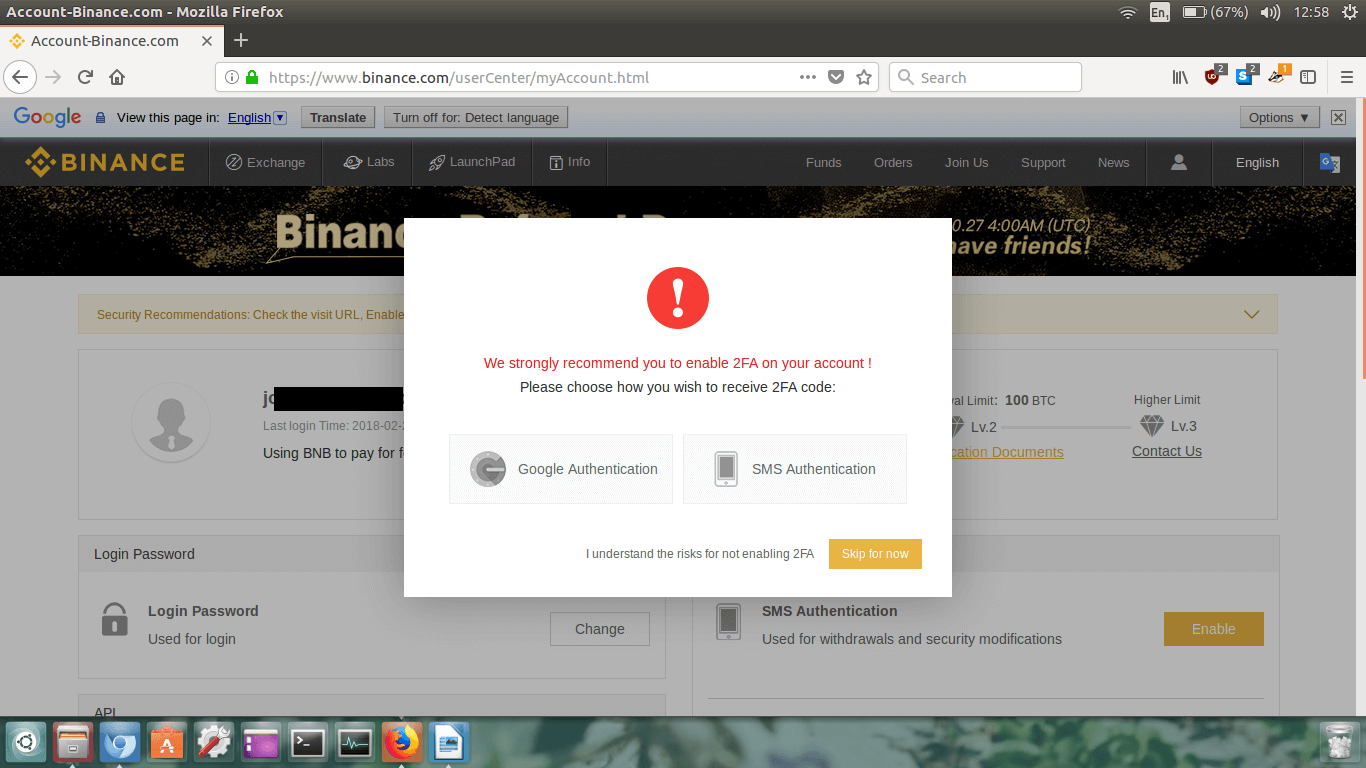
I highly recommend you enable 2FA on your account because this adds an extra layer of security on your
account when logging in and making transactions.
For simplicity purposes, you can probably get away without enabling 2FA and nothing will go wrong.
Also, if you don’t have a mobile device just skip it for now. But if you plan on using Binance regularly,
definitely set it up.
Anyways, I like to be safe so I’m going to set it up.
Click the button on the left that says
Google Authentication.
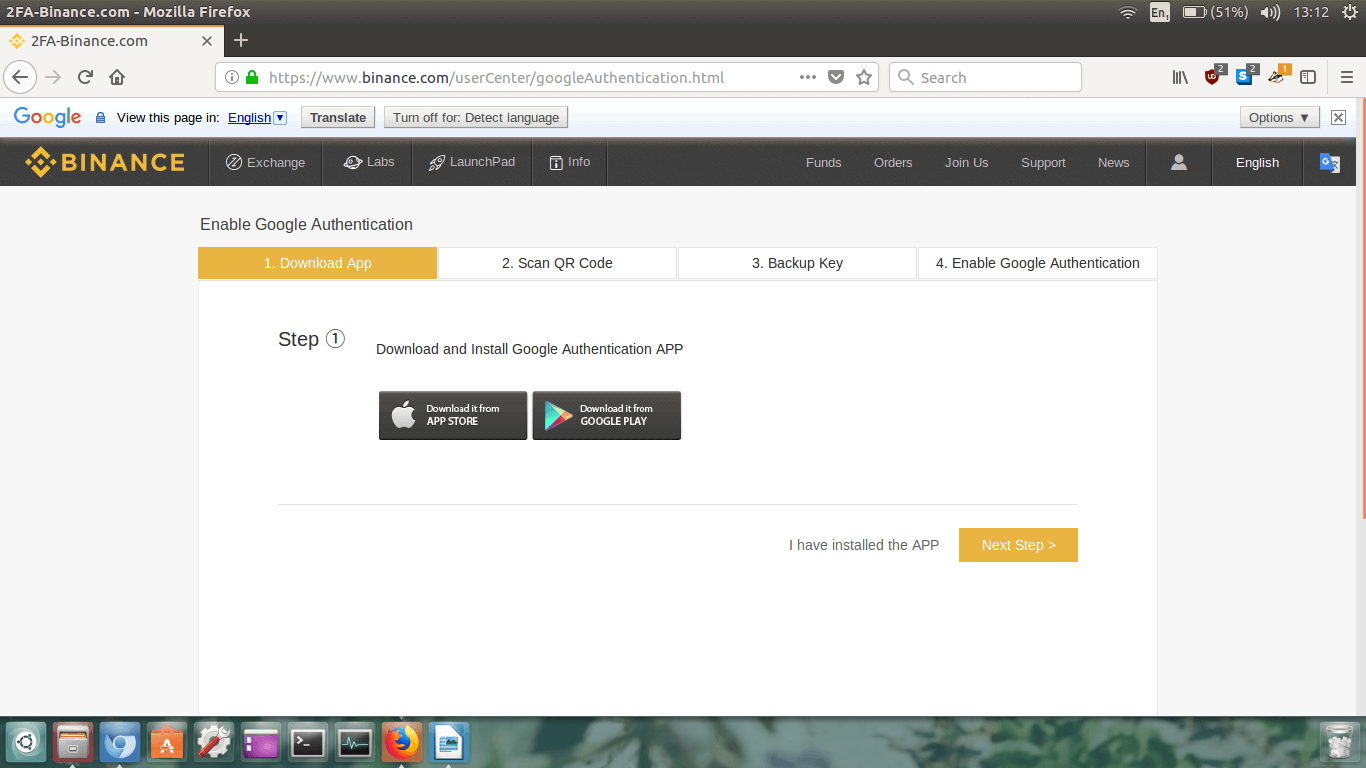
The newly loaded page will prompt you to download the Google Authenticator APP on your mobile device from
the Apple App Store or the Google Play Store. Once you have downloaded and installed the app,
click
Next Step.
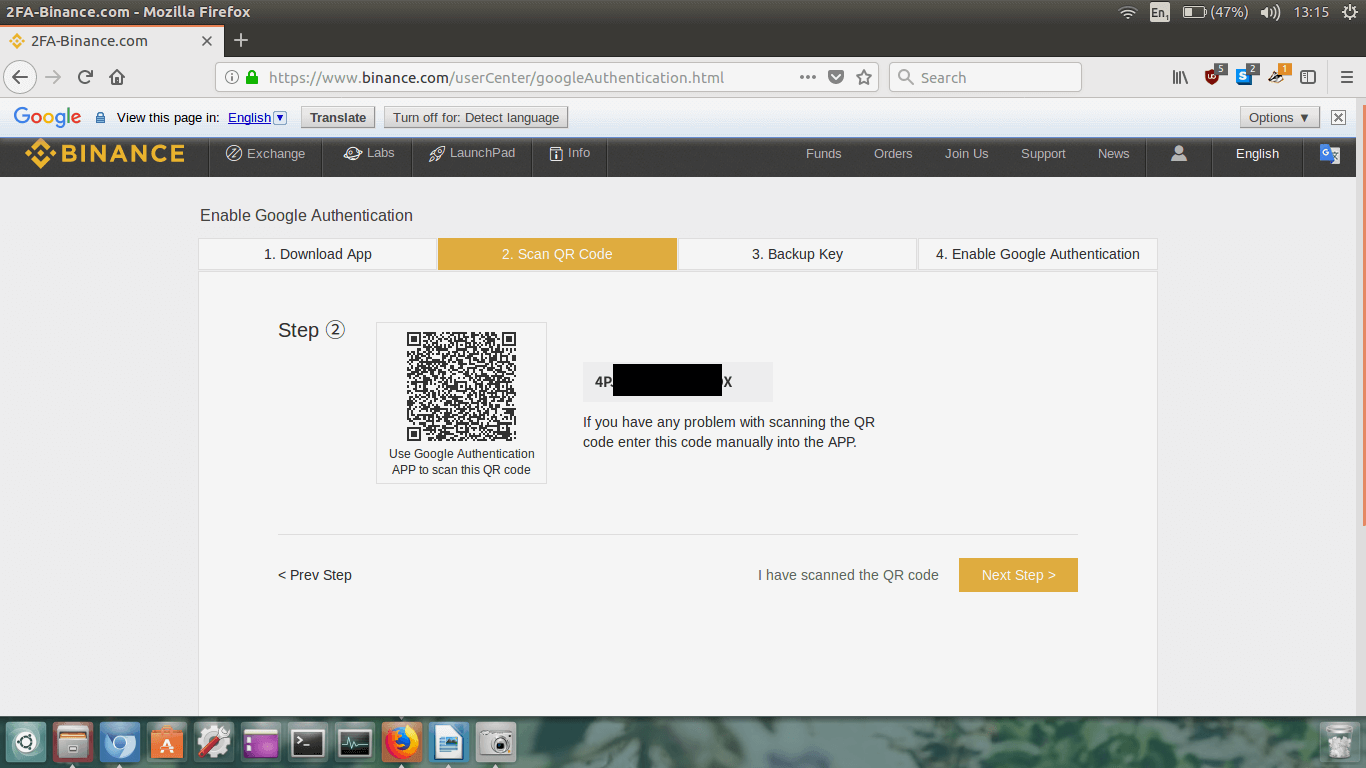
Now, what you must do is open the Google Authentication app on your mobile device, and click the little
red cross in the bottom left corner (as seen in the image below) and then choose
Scan a barcode.
Now, use the app to scan the square QR barcode on the Binance webpage. Awesome!
The Binance 2FA will now be listed in your app, and ready for you to use whenever needed. With 2FA enabled
you will now always need that device and the 2FA generated code in the app to access your account.
Just make sure you have multiple hand written copies of your backup code in case you lose your mobile
device or it breaks. We will do this in the next part, so click
Next Step.
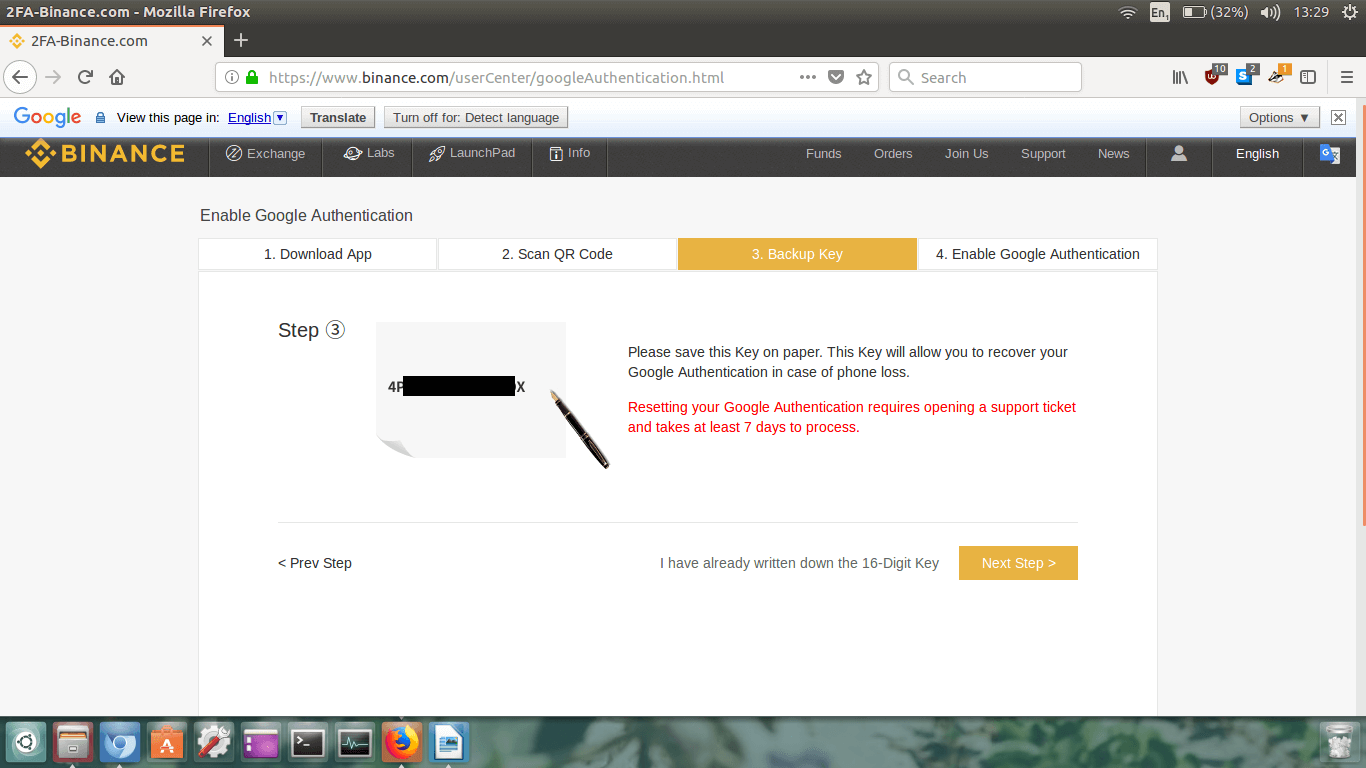
Write the 2FA back up code down on two different bits of paper, and hide them somewhere safe. Keep these
private!
Once you’ve done that and triple checked them, click
Next Step.
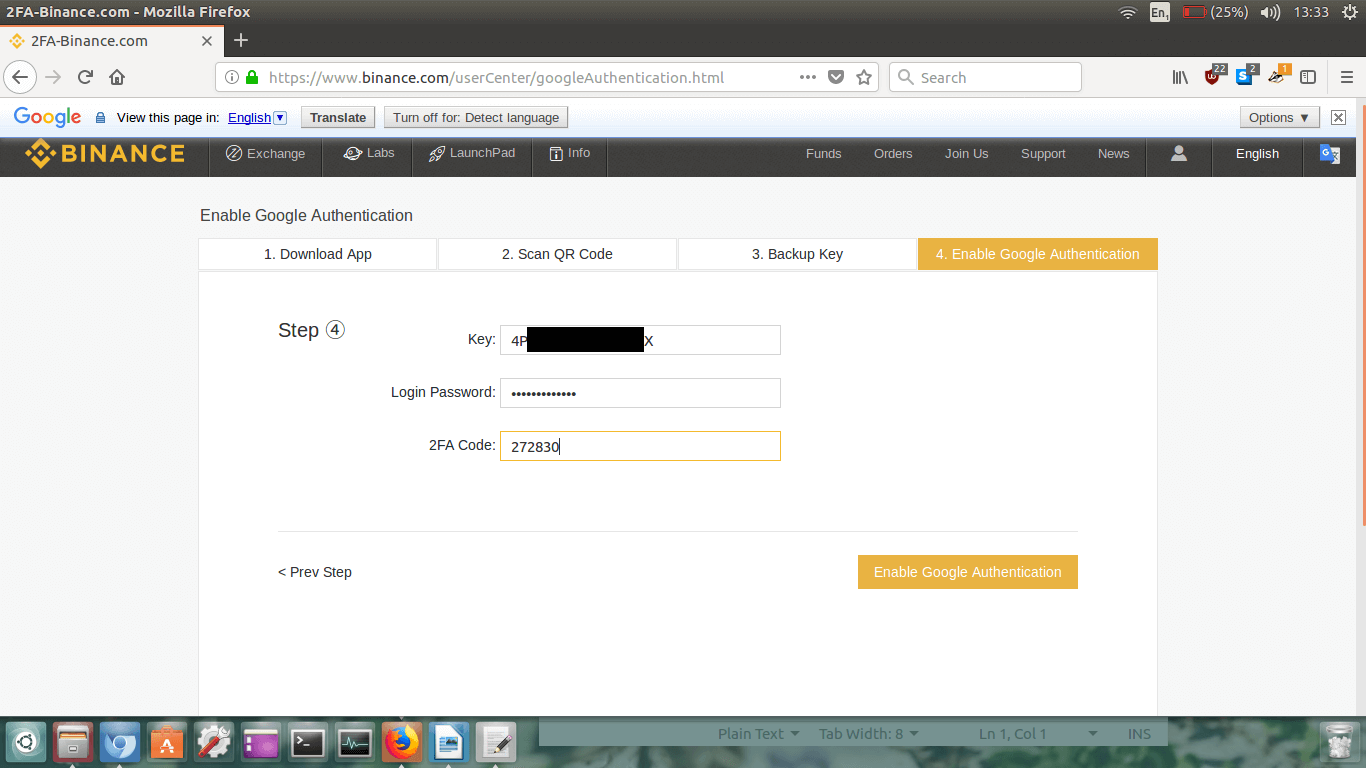
Ok, so where it says
Key, you need to type in your 2FA back up
code you just wrote down on paper.
Type in your password.
And then finally open the Google Authenticator app on your mobile device, and on the Binance page where it
says
2FA Code type in the currently valid 2FA code from the app.
Try to do this quick or it will change.
Once they are all correct click
Enable Google Authentication.
You should see a little success box appear, and then you will be automatically redirected you to your
account page.
Note: 2FA works based on time. When you re-login to Binance, if for
some reason it declines your 2FA code, keep trying it for 10-20secs after the code has already changed on
your mobile device.
Step 5.
Ok, so now your Binance account page should automatically load up.
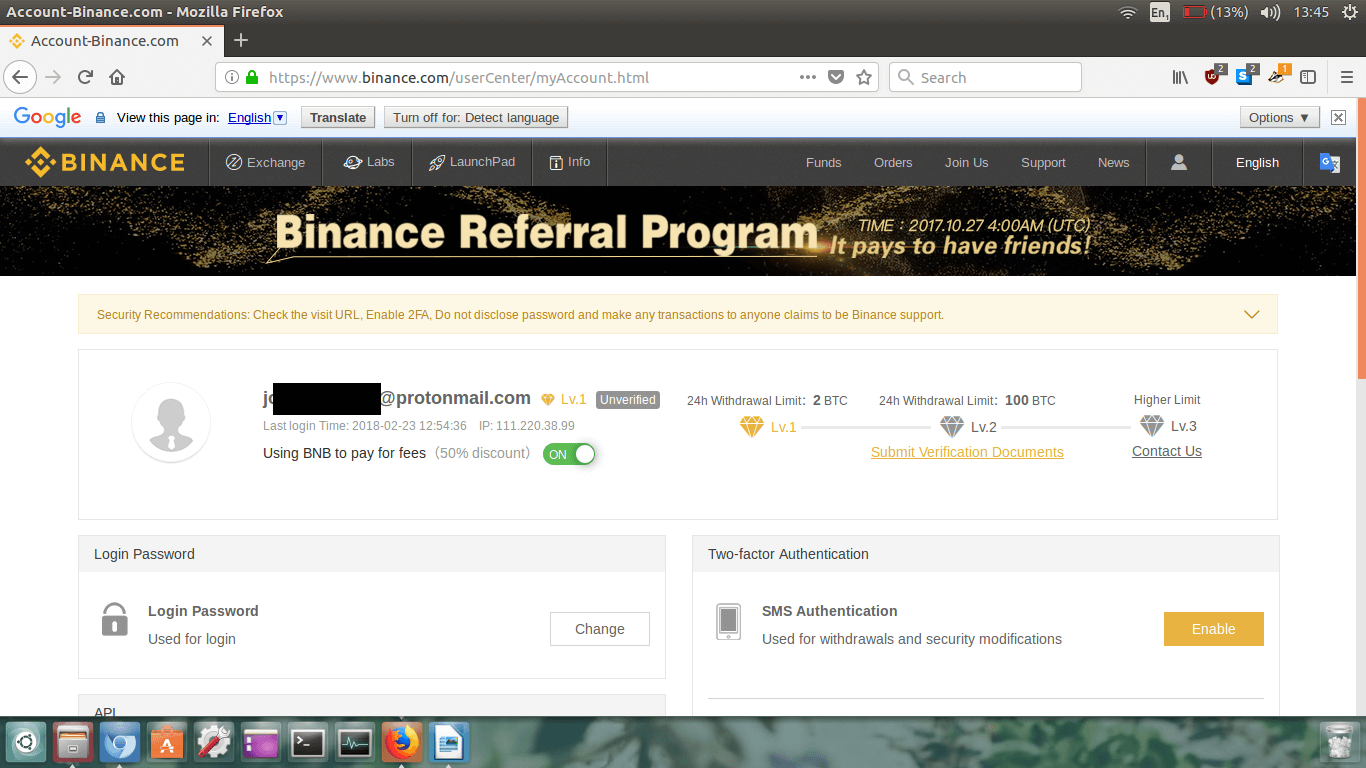
You can see that without ID verification the maximum withdrawal is any amount equivalent to 2 BTC.
If you want to withdraw a larger amount complete the
Submit Verification Documents process. Because 2 BTC
(which is equal to approximately 20k USD at the time of writing) withdrawal is enough for me,
I’m going to leave it for now as I’m not planning on buying over $20k worth of XMR.
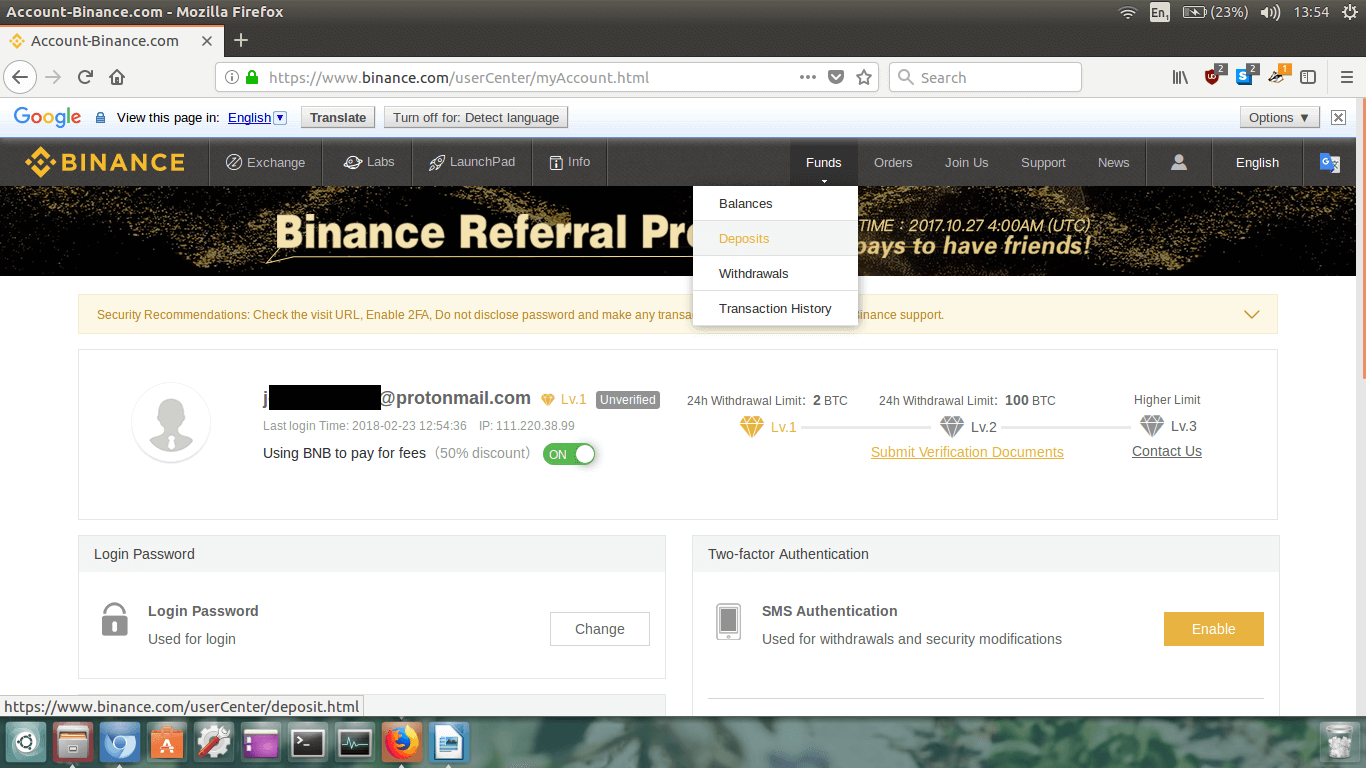
Click on
Funds, and then click on
Deposits in the drop down menu.
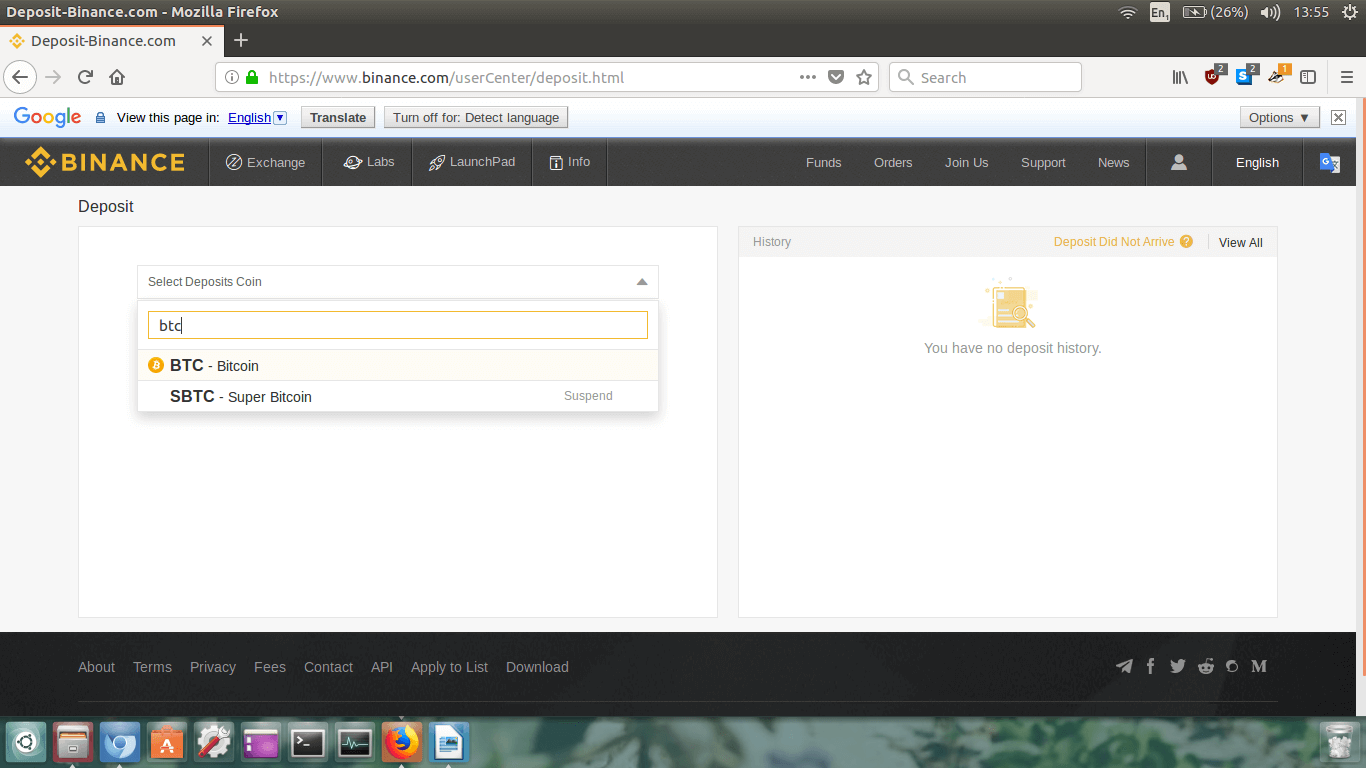
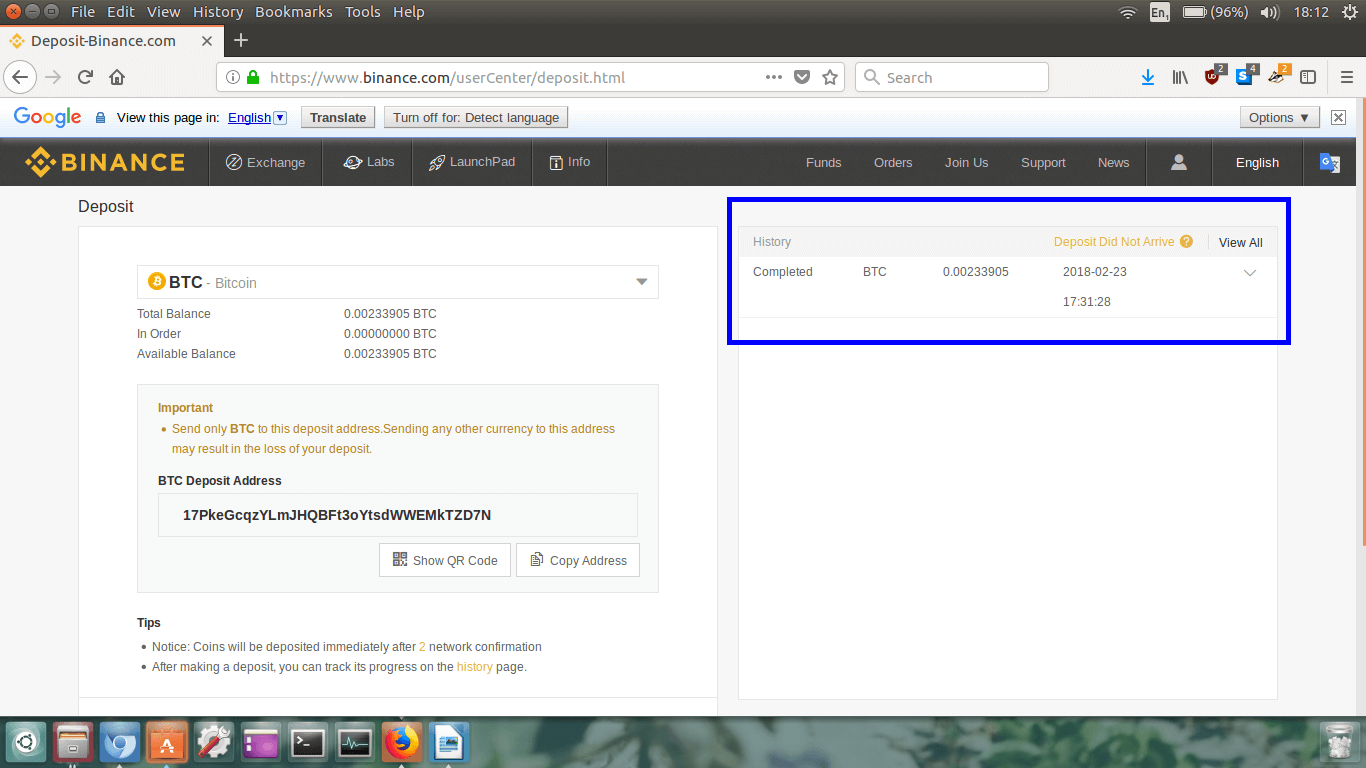
Now we’re on the
Deposit page. We need to deposit some
cryptocurrency onto Binance to trade it for Monero.
Because Binance only offers a BTC/XMR and ETH/XMR pair, we need to have BTC or ETH in order to trade it
for Monero. It is relatively cheap to send Bitcoin at the moment (approximately 10 cents), so I’m going to
deposit BTC to my Binance account.
Note: You can deposit ETH and still follow this guide, just alter
it as needed! Also, if you deposit a different cryptocurrency such as Litecoin, bear in mind that you will
have to trade your LTC for BTC first, and then trade the BTC to XMR, which means you will pay a small
amount of additional exchange fees.
As you can see in the image above, click on
Select Deposits Coin
and type in the coin you would like to deposit. In this case, I’m going to type in
BTC, and then click on
BTC – Bitcoin from the drop down list.
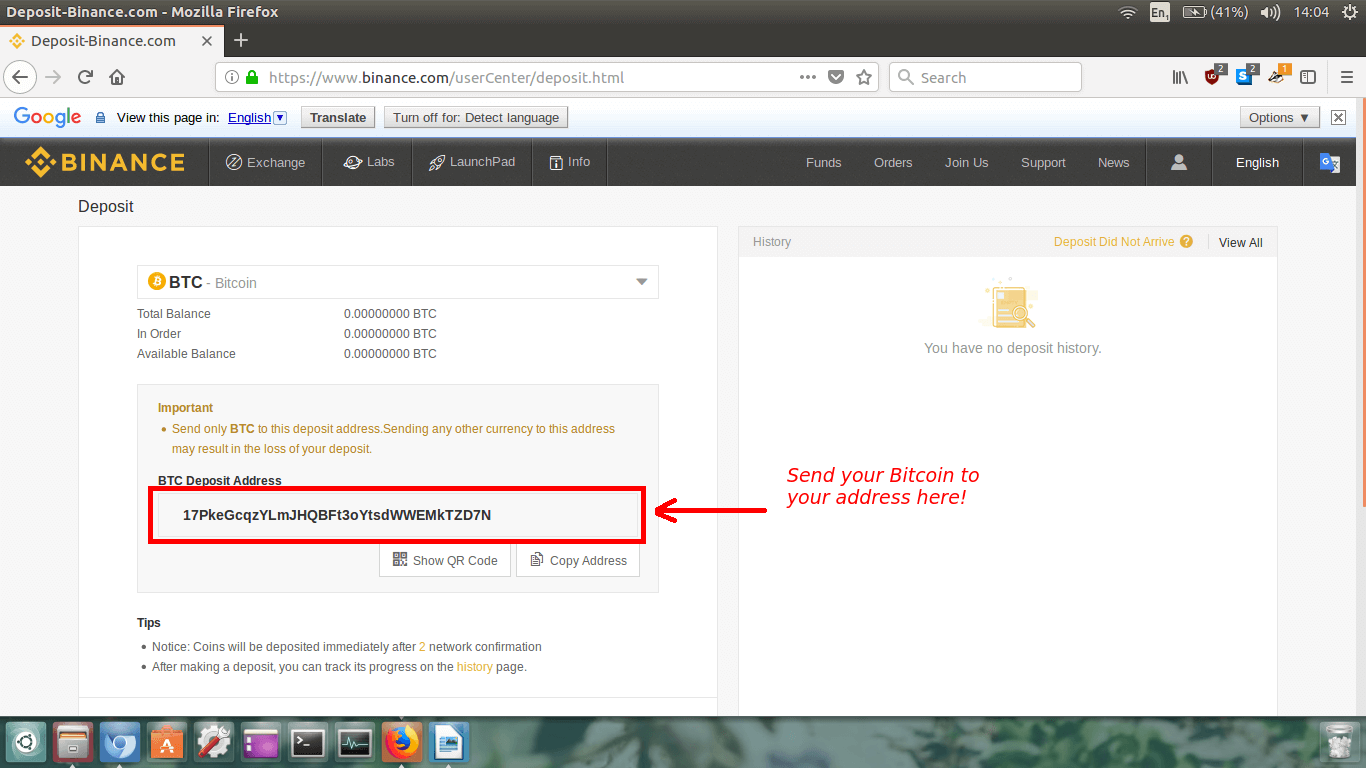
You will now see the details of your Binance BTC wallet.
What you need to do now is deposit your Bitcoin to the
BTC Deposit Address.
You BTC Deposit Address will be different to mine!
Again, what you must do now is send Bitcoin from your current BTC wallet to your Binance BTC deposit address.
Do this now, but be sure to triple check you have all your addresses correct!
Step 6.
Once you have sent Bitcoin to your Binance wallet, keep your eyes peeled on the
History section on the right hand side of the page.
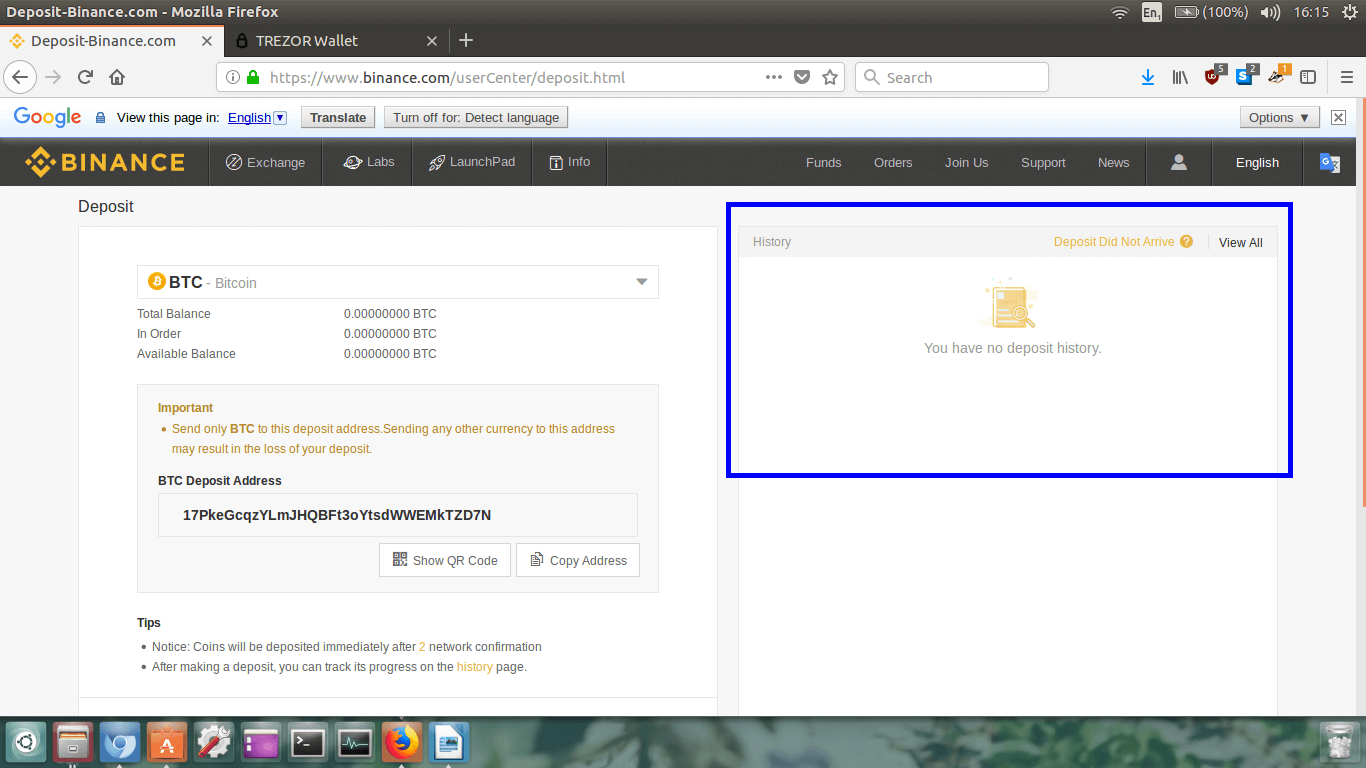
It will take a while for the transaction to appear, so be patient here. It could take from 15mins to 6hrs+
depending on the transaction fee you paid to send your BTC to Binance.
This is optional, but if you are curious, you can go to
blockchain.info
to track your transaction. Once you’re on the blockchain.info main page, paste in your Binance BTC wallet
address into the search bar and hit enter. Your wallet details will load up, and you will be able to see
the number of confirmations your transaction has. Your coins will be deposited into your Binance BTC
wallet after 2 confirmations.
Finally, after about 1 hour, my Bitcoin has arrived in my Binance BTC wallet.
It is recorded in the
History section.
Now we have our Bitcoin, we need to trade it for Monero.
Step 7.
Click on
Exchange in the top left of the page, and then click on
Basic in the drop down menu.
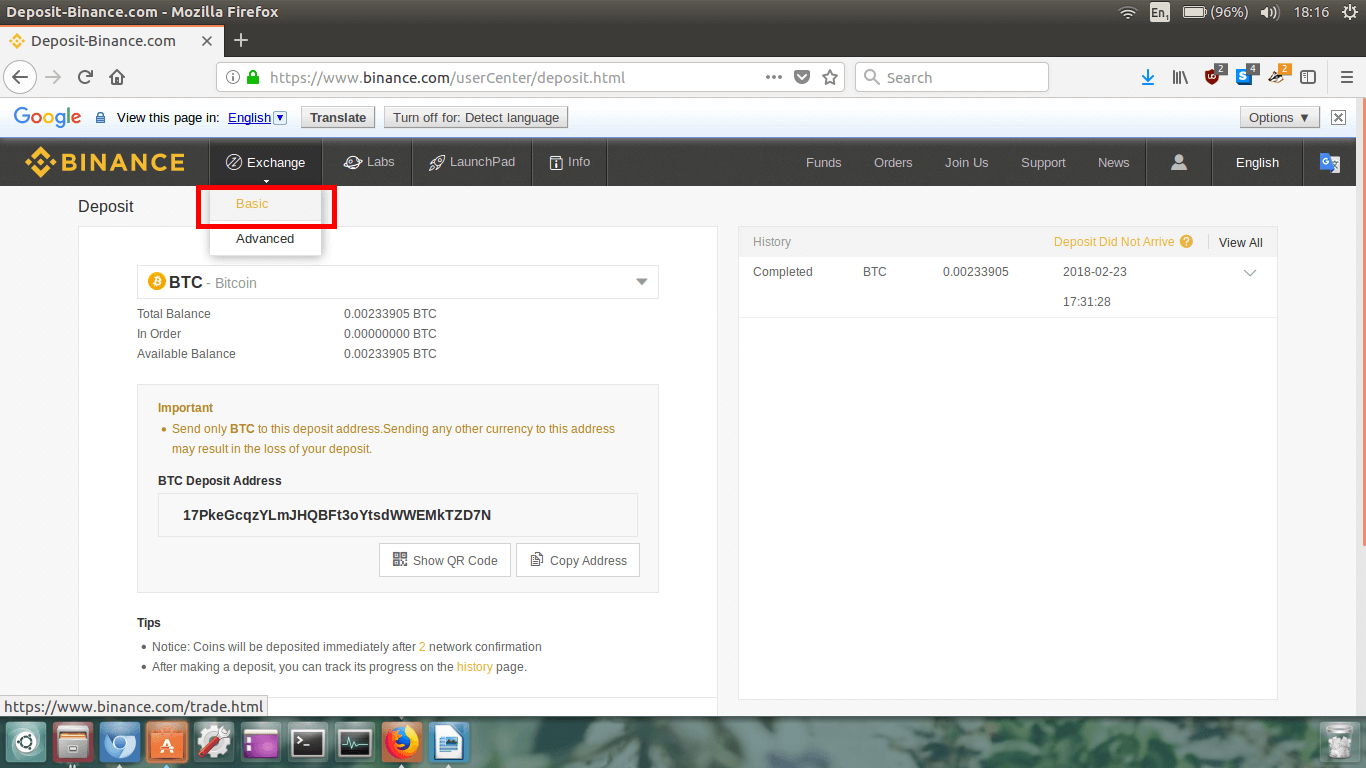
The trading page will now load. It will look like this:
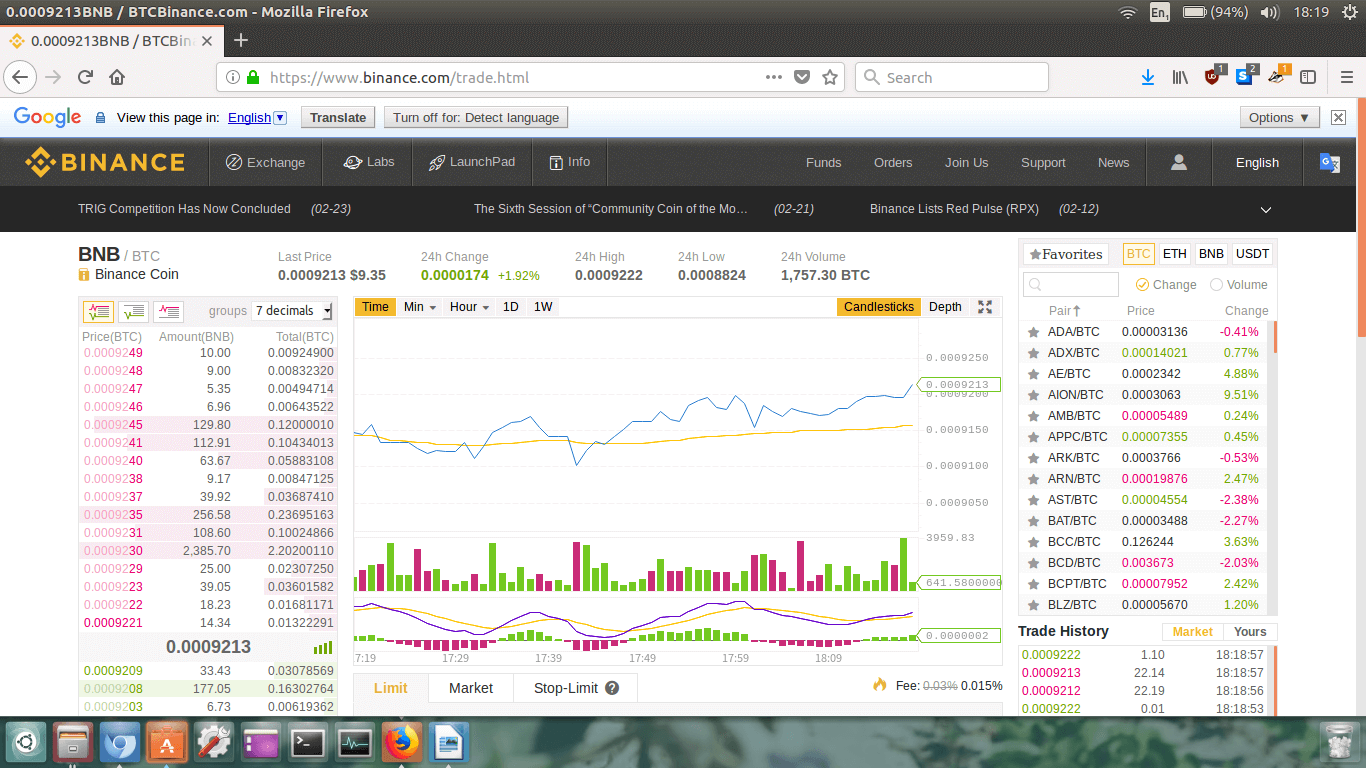
It’s ok, don’t freak out from all the numbers. I am here to help you through this.
The first thing we are going to do is locate the
XMR/BTC trading pair.
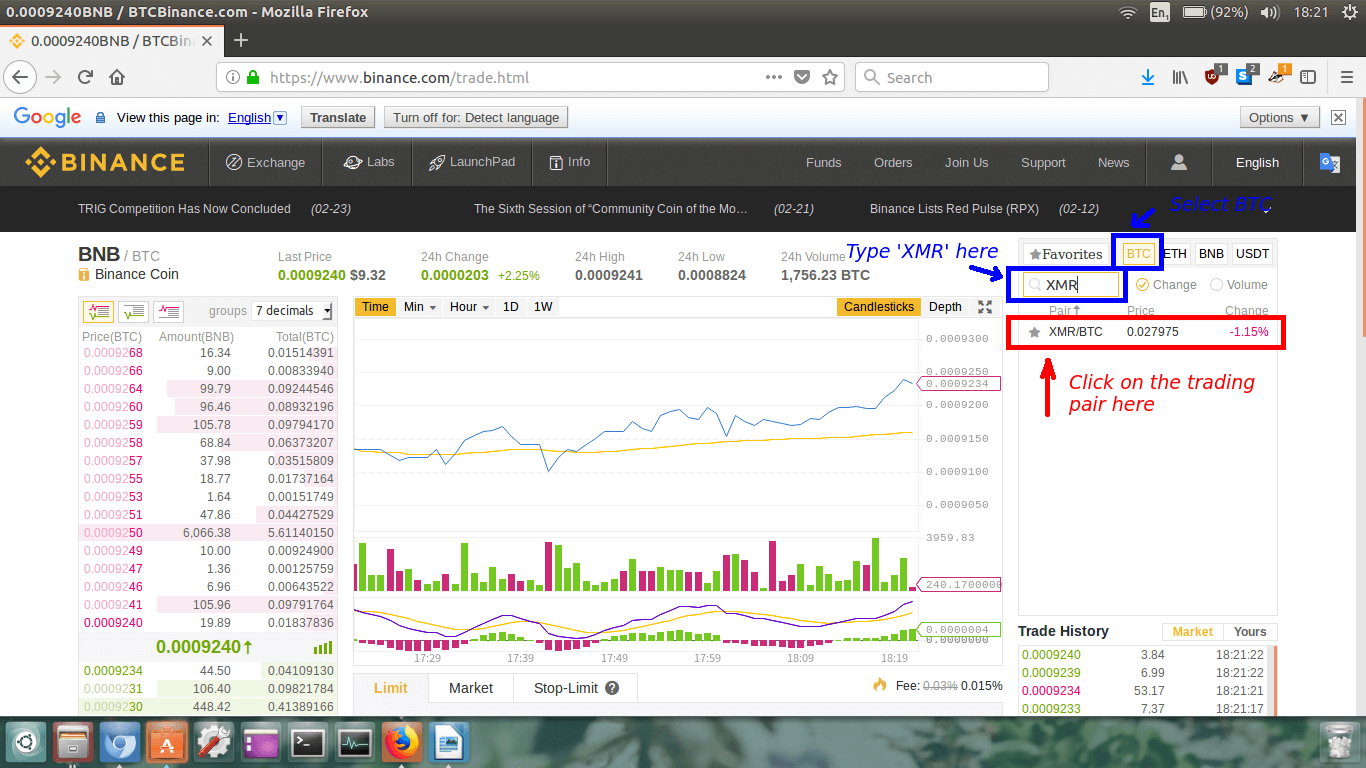
We need to focus on the upper right hand section of the screen. Next to the
Favourites box, ensure
BTC
is selected (it is highlighted in blue above).
Note: If you’re
trading ETH to XMR, select the ETH box.
Once BTC has been selected, type in
XMR into the little search
box (also highlighted in blue).
Once you’ve typed in XMR, the
XMR/BTC trading pair will appear.
Click on the XMR/BTC trading pair.
The XMR/BTC trading page will load.
You will see the XMR/BTC trading page. Check that it says XMR/BTC in the top left corner so you know
you’re in the right place.

Now down underneath the graph, in the
Buy XMR section click on
Market. A market buy means we want to buy Monero for whatever is
the cheapest Monero is currently selling for.
The Buy/Sell section will now change.
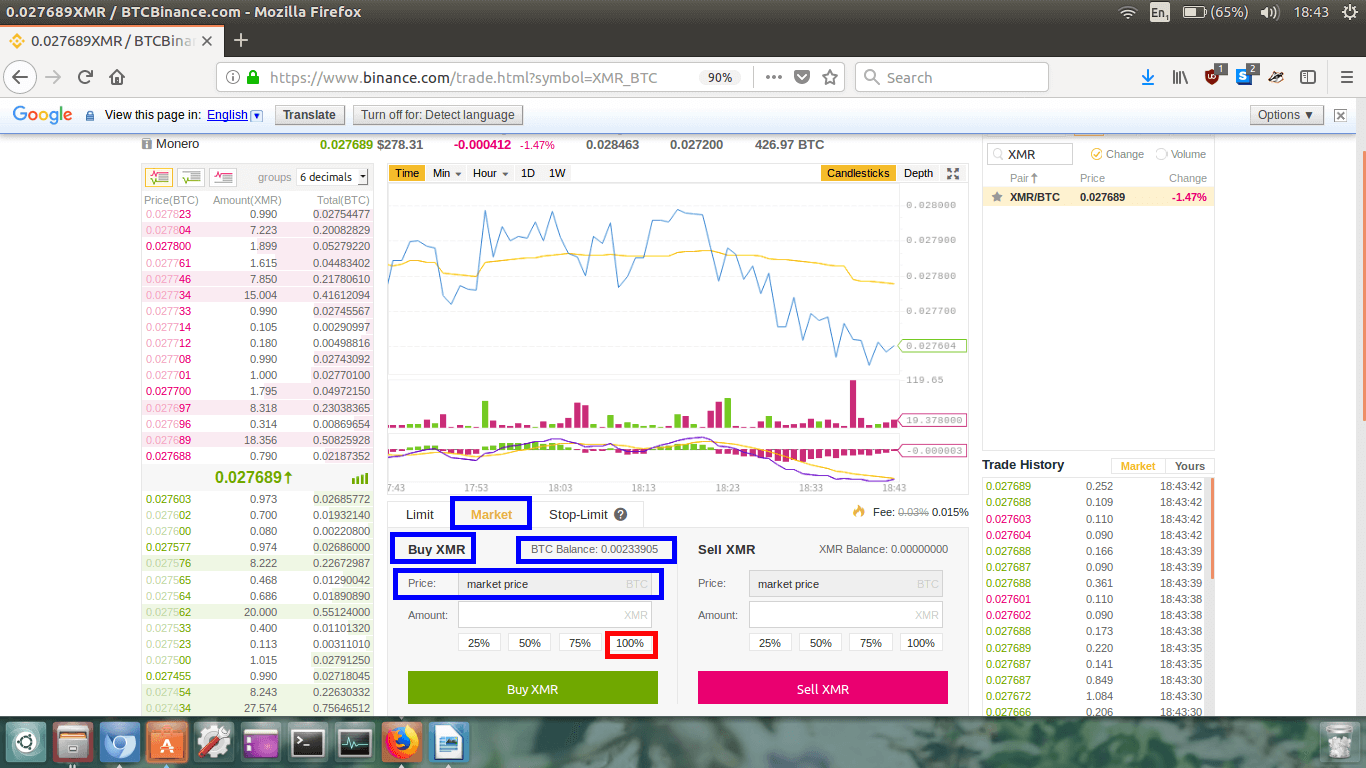
In the image above I have highlighted things to check.
First, underneath the
Market tab, check that it says
Buy XMR so we don’t accidently buy a shitcoin instead.
To the right of that we can see our BTC balance.
We are buying at the best possible price right now so we can see it says
market price in the
Price box.
Finally, the
Amount box will be empty. This is where you can
manually type in how much XMR you want. However, I want to trade all of my BTC for Monero so I will
just click on the
100% box. If you want to trade half of your BTC
for Monero, click 50%.
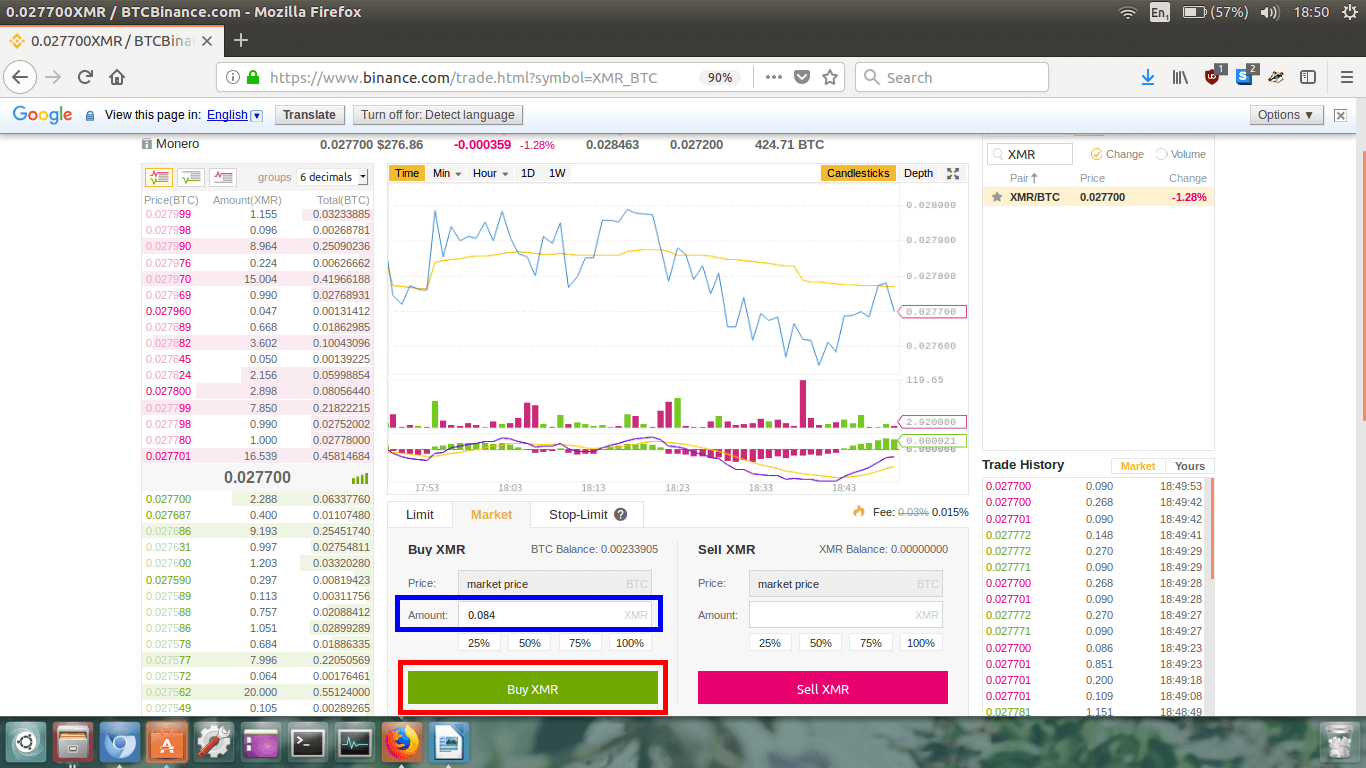
Ok, so I just clicked the 100% button, and as you can see in the
Amount
box, it automatically calculate approximately how much Monero I will receive. I will receive approximately
0.084 XMR.
Now, just check things over one last time, and then click the big green
Buy XMR button.
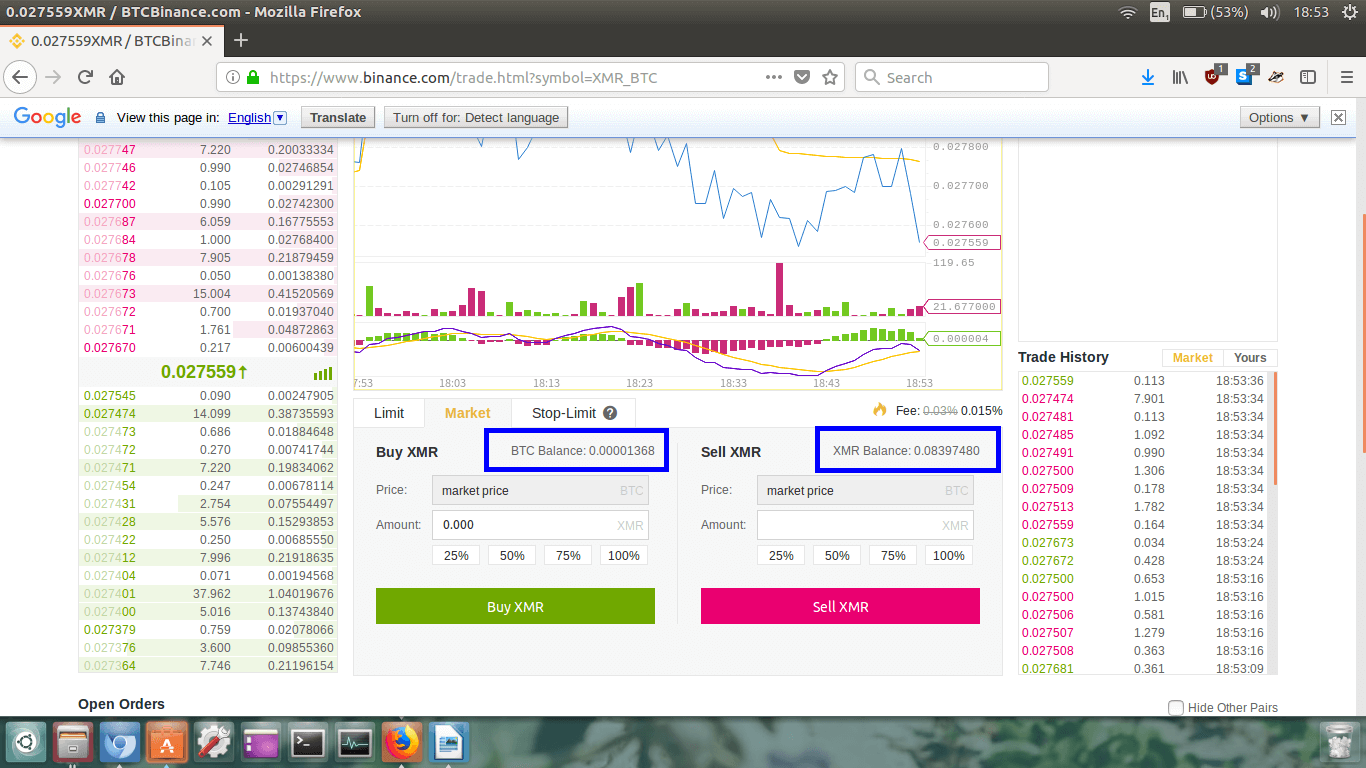
Check your
BTC Balance and
XMR Balance. If there’s a little residual BTC left over don’t
stress over, it’s probably only a few cents worth.
My balances all look good to me.
Now, we need to get our Monero off the Binance exchange and into our own personal wallet!
Step 8.
We need to navigate to
Withdrawals to get our XMR out of Binance.
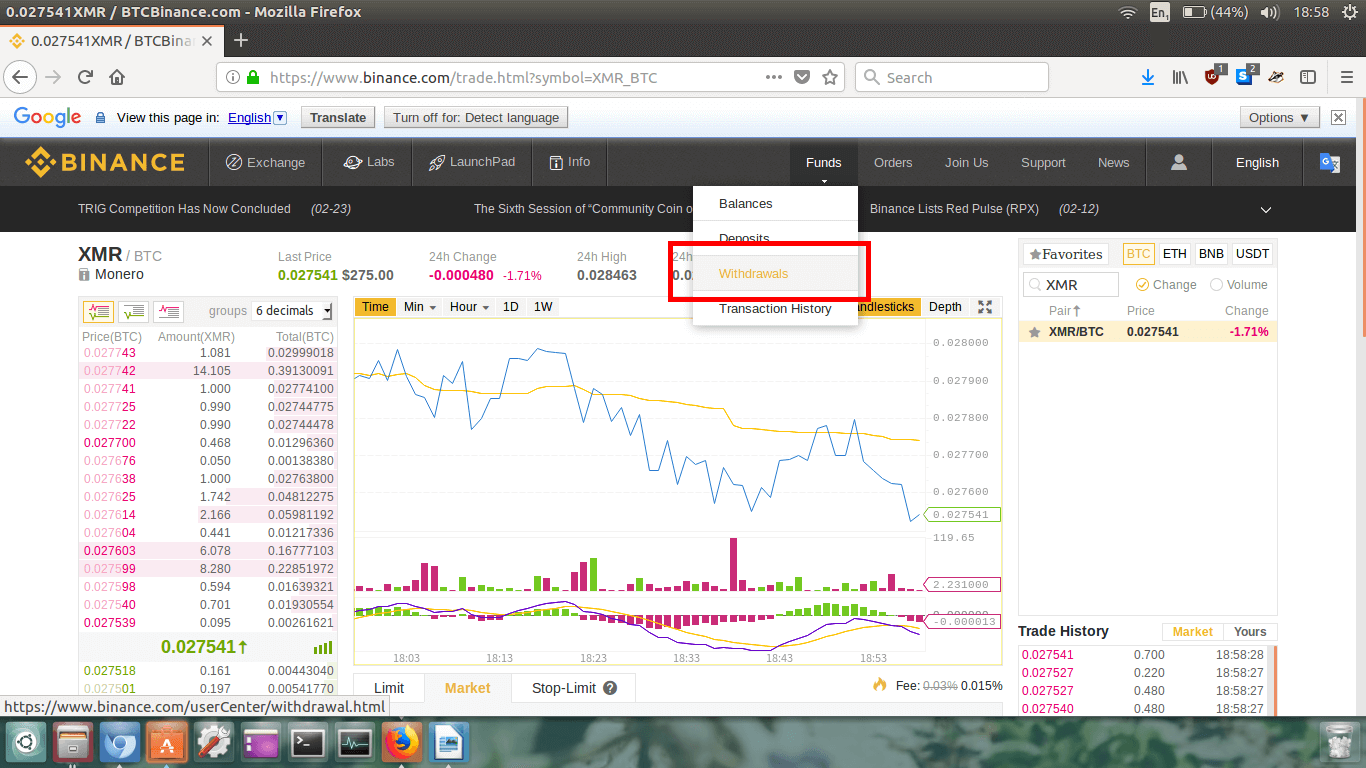
Click on
Funds, and then click on
Withdrawals from the drop down menu.
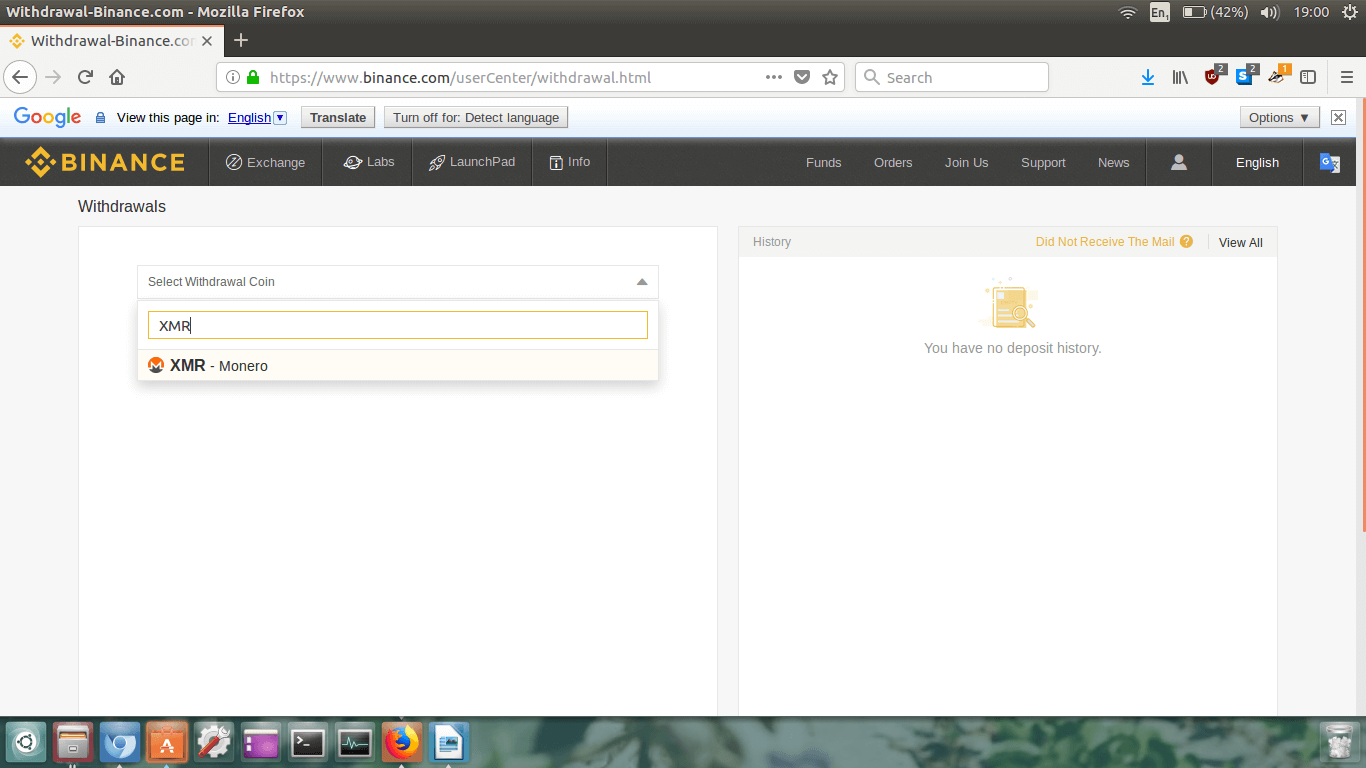
Click on
Select Withdrawal Coin, type
XMR into the drop down menu, then click on
XMR – Monero when it appears.
At the top left check that we’re on the
Withdrawals page.
Next just double check that we’re on the Monero withdrawals page too.
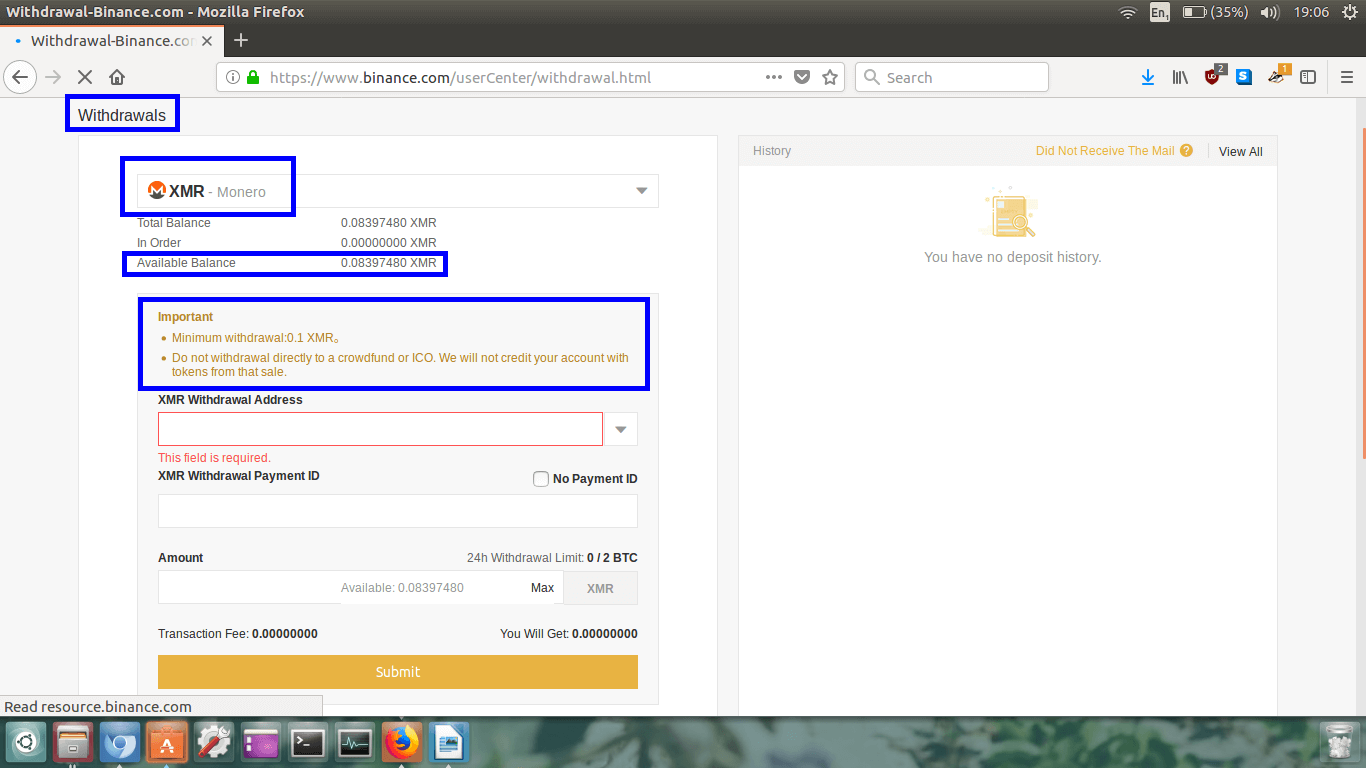
We can also see our
Available Balance.
Underneath that, there is a section that is titled
Important.
Now, I’ve found myself in a predicament here. If we read it closely, it says the
minimum withdrawal is 0.1 XMR, but I only have 0.08397 XMR!
I’m going to have to send some extra Bitcoin to my Binance BTC wallet, and then trade it from Monero so
I have over 0.1 XMR to withdraw my balance.
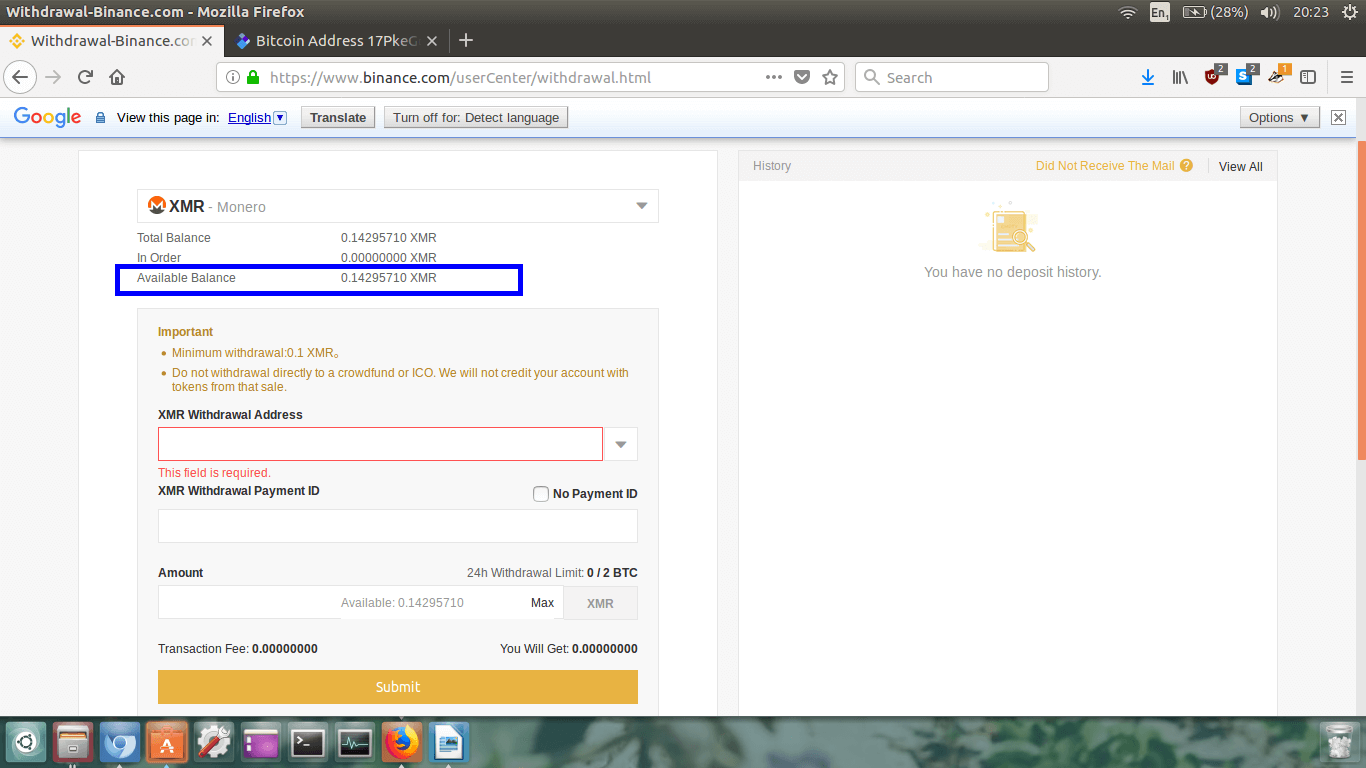
You can see above I have bought more Monero. I simply did this by depositing more Bitcoin and then
trading it for Monero (repeat Steps 5, 6, and 7 of this guide!)
Again, check you’re on the XMR withdrawal page, and check your available balance.
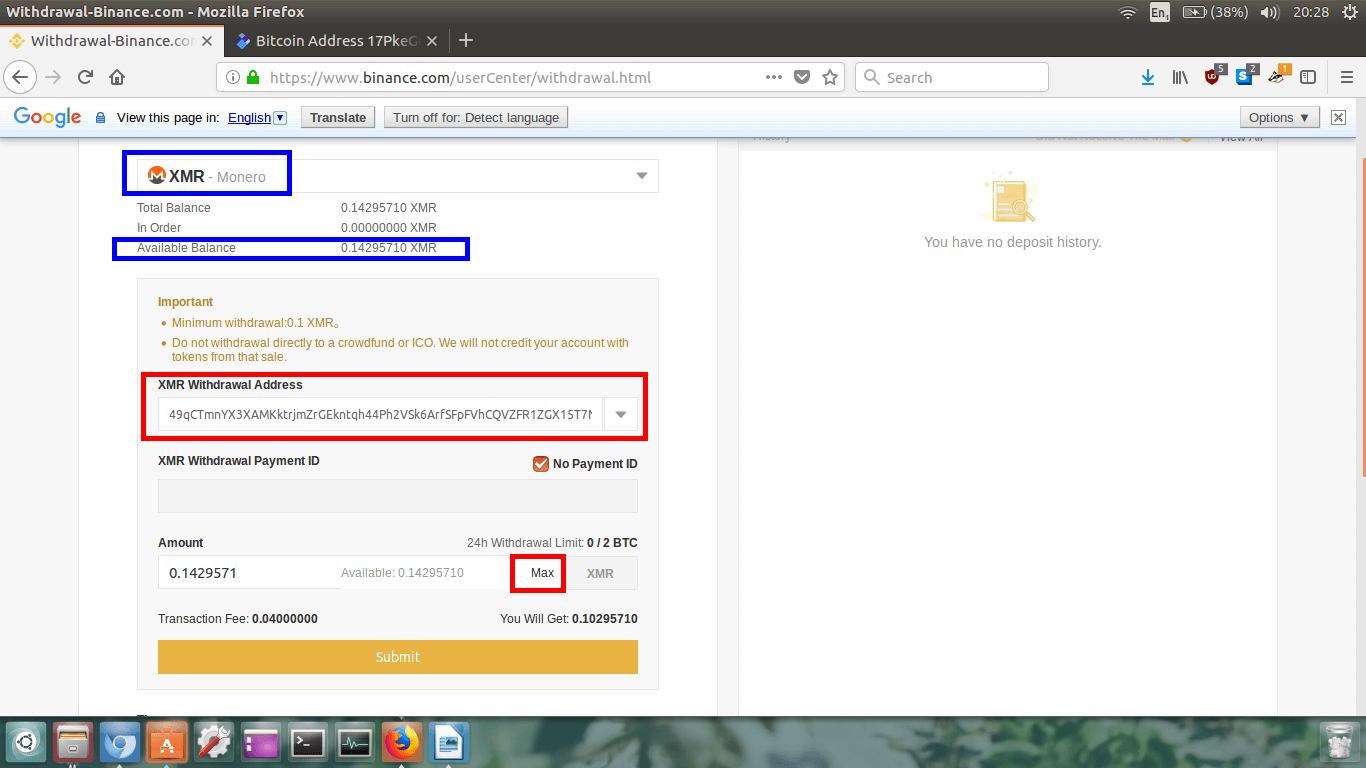
In
XMR Withdrawal Address box, copy/paste the Monero address you
want to withdraw your Monero to.
Below that, it says
XMR Withdrawal Payment ID and next to that is
a check box
No Payment ID.
If you are withdrawing to a different exchange or to a business, check if you need to enter a payment ID
and paste it into the box.
If you’re withdrawing to your own personal wallet (such as the Monero GUI, Monerujo Android wallet, or
Cake IOS wallet), you won’t need a payment ID so feel free to tick the
No Payment ID box like I have.
In the
Amount box, type in how much of your Monero you would like
to send. Remember there is a minimum withdrawal of 0.1 XMR. I want to withdraw it all so I clicked
Max and the withdrawal amount automatically loads into the box.
Below that, we can see Binance charges a whopping fee of 0.04 XMR, so in my case I will only receive
0.010295 XMR.
Check everything over, make sure there are no errors, and then click the
Submit button.
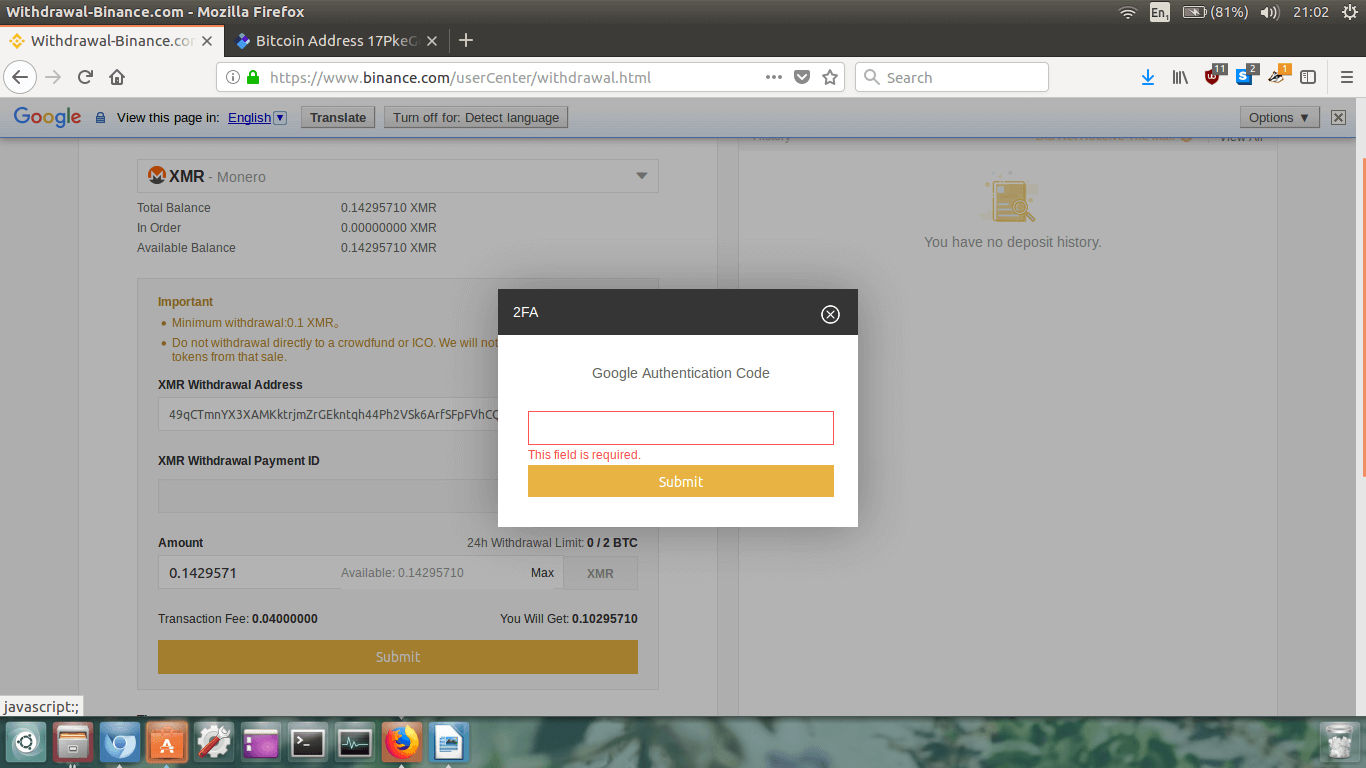
A box will now appear on screen requesting your Google Authenticator 2FA code.
Open the Google Authenticator App on your mobile device, and type in the currently valid six digit
2FA code for your Binance account.
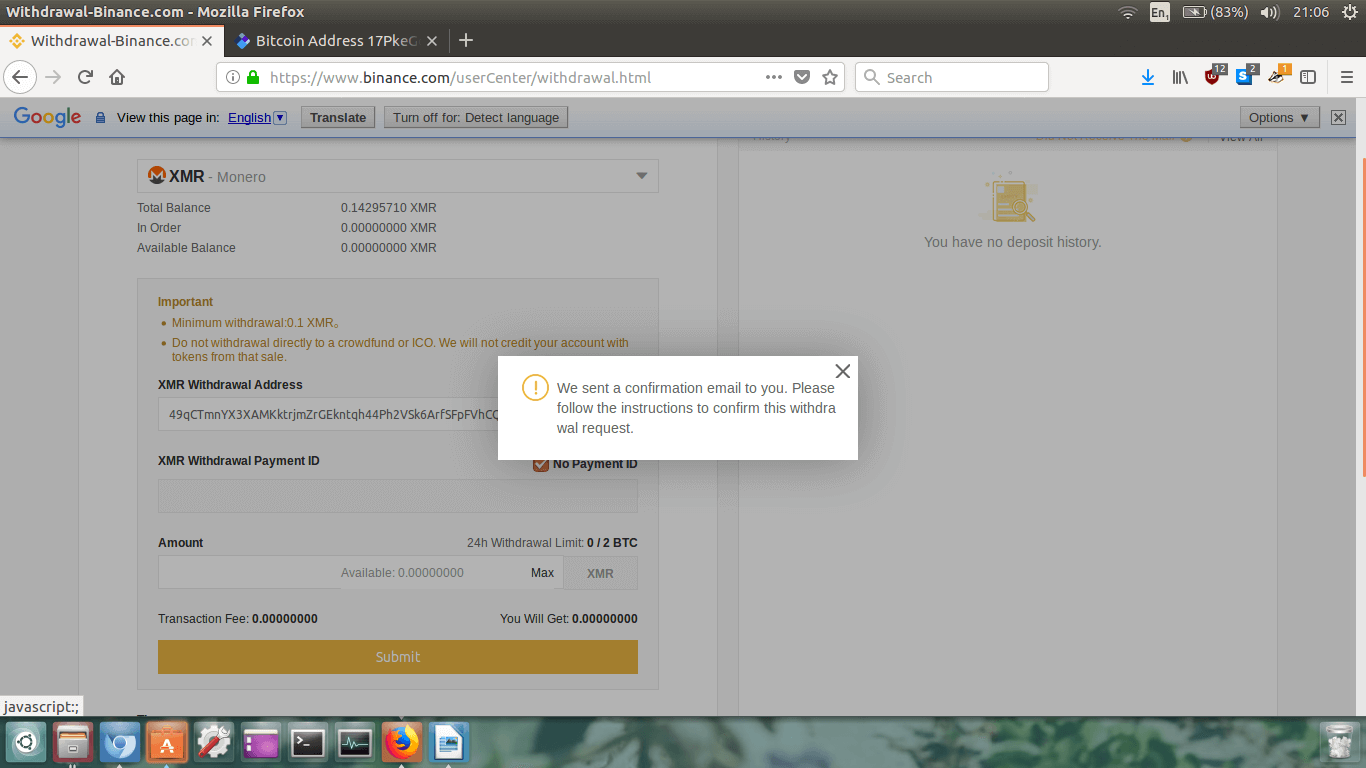
A confirmation email will be sent to you.
You must now login to your personal email address to verify the withdrawal.
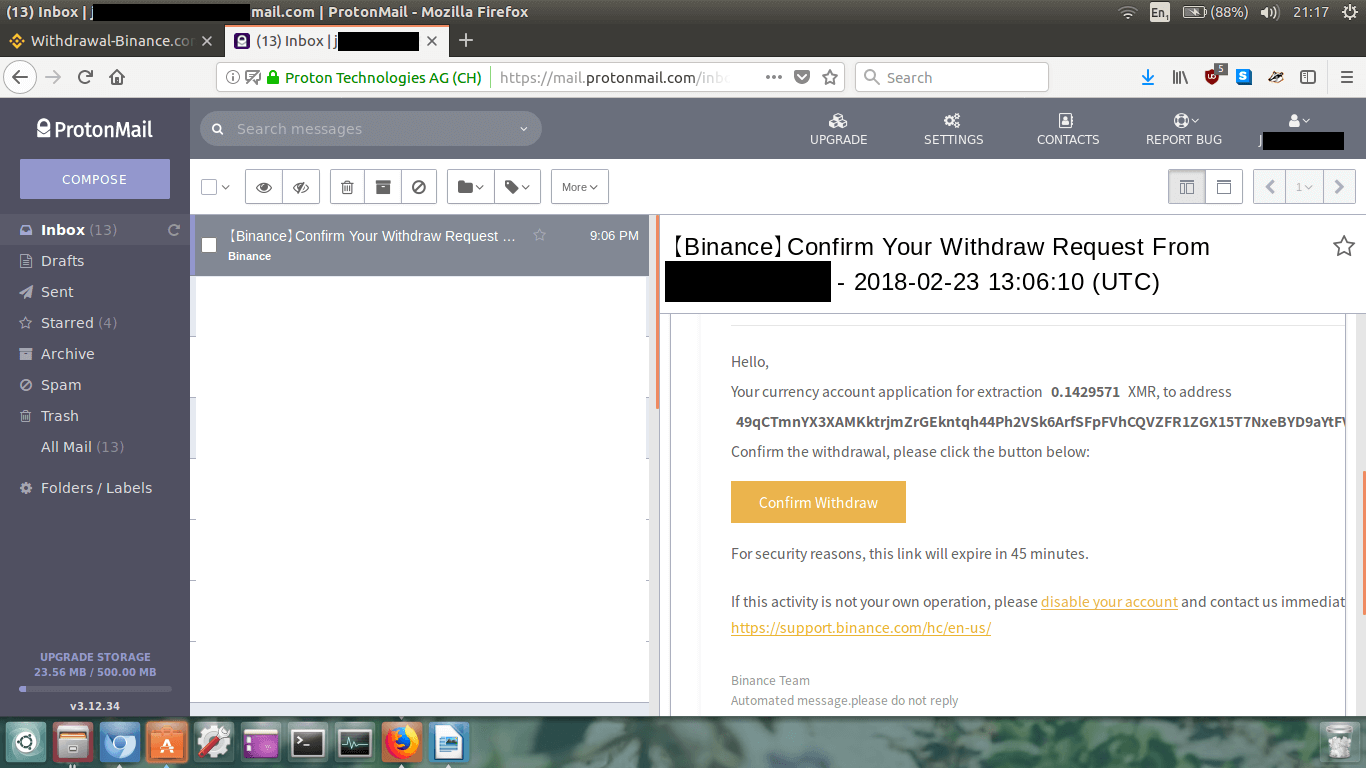
Click the
Confirm Withdraw button located within the email you
received.
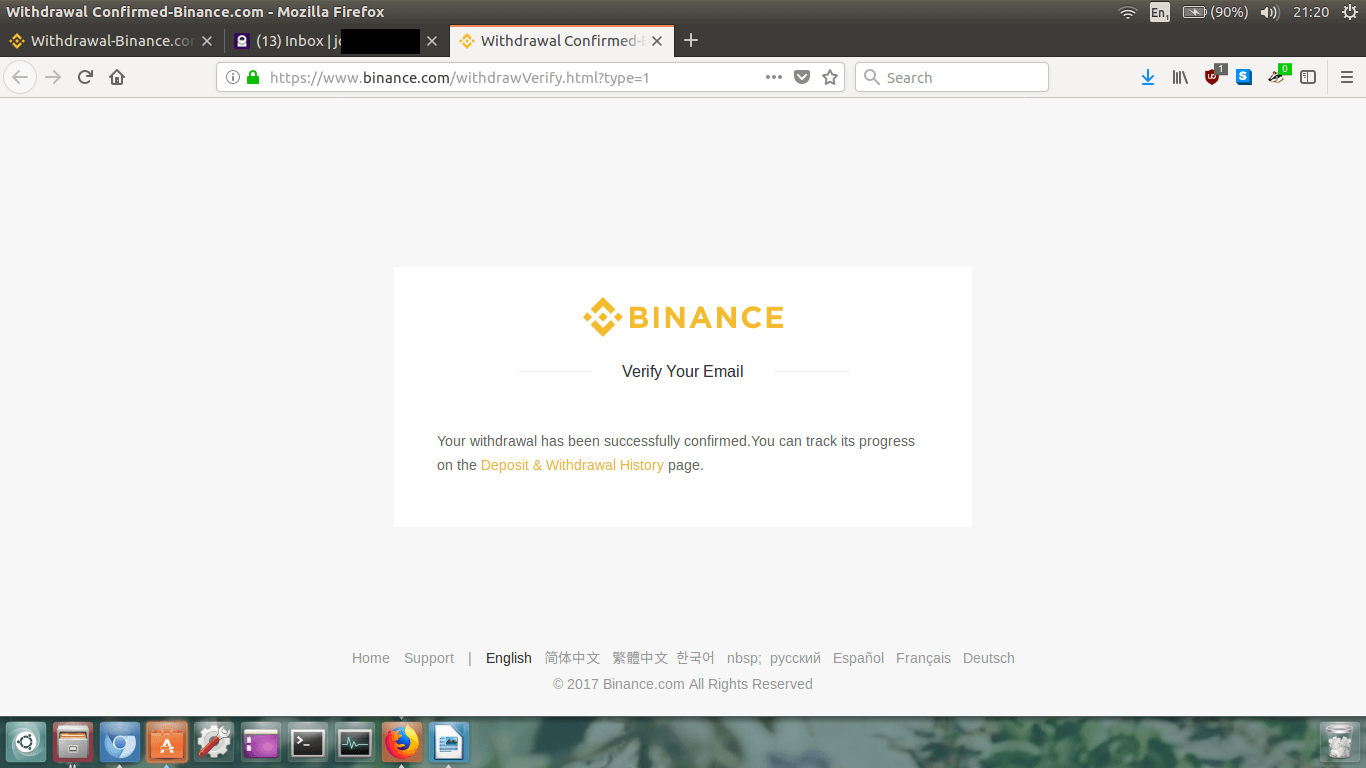
A new page will appear in your browser.
It will confirm that your withdrawal was successful.
Feel free to track the withdrawal progress by clicking on
Deposit & Withdraw History.
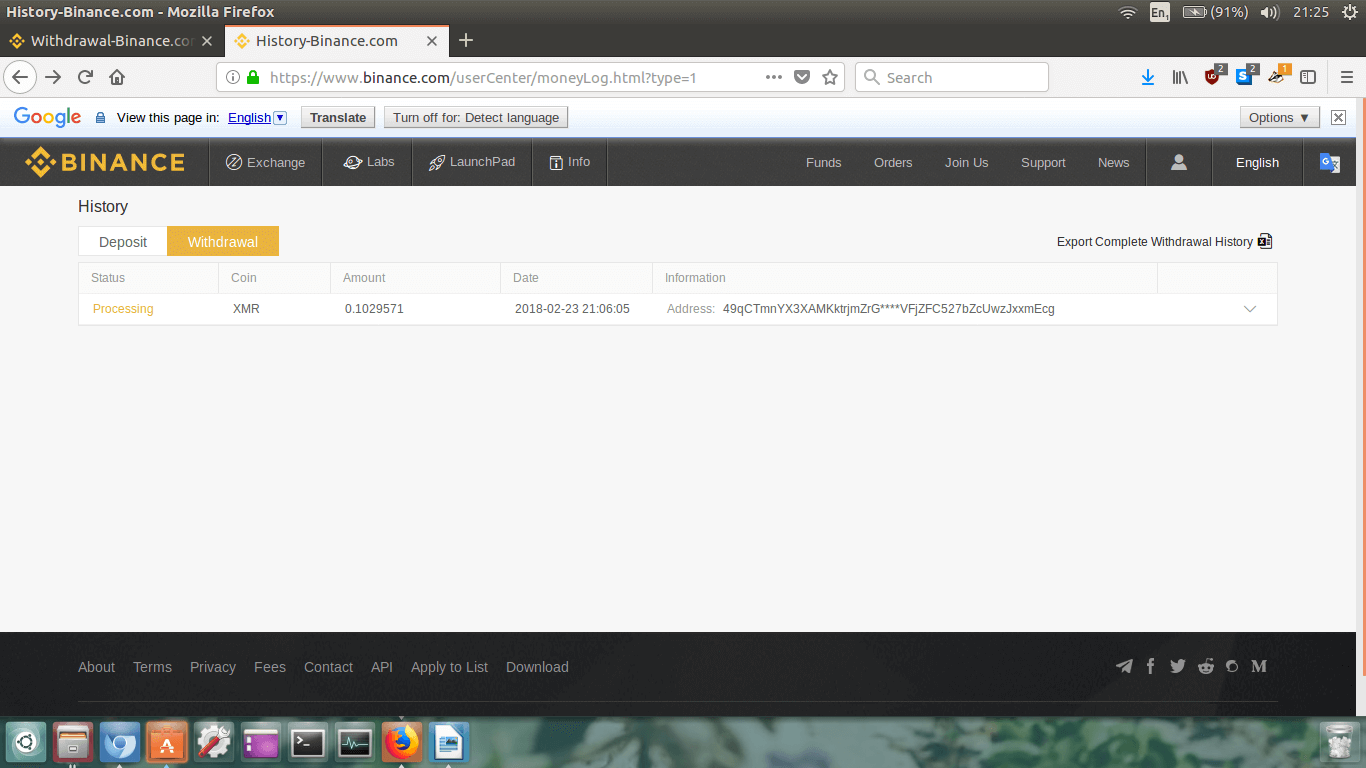 There you go. You’ve done it!
Sit back and wait for your Monero to arrive at your receving address. It might take 20-40mins,
so grab a beer and relax.
Conclusion
To recap, after following this guide you will have learned how to register and verify your email at
Binance, how to setup 2FA for your account,
how to deposit Bitcoin into your account, how to trade your Bitcoin for Monero, and then how to withdraw
your Monero off the exchange into your own wallet. Congratulations!
John's beer money:
49qCTmnYX3XAMKktrjmZrGEkntqh44Ph2VSk6ArfSFpFVhCQVZFR1ZGX15T7NxeBYD9aYtFVtVFjZFC527bZcUwzJxxmEcg


 monero.how